Fixation and Embedding of Cells and Tissues for Transmission Electron Microscopy
I. INTRODUCTIONChemical fixation is the first step in most procedures for the preparation of cells and tissues for transmission electron microscopy. It is a very critical step, as the quality of fixation is of fundamental importance for results of the electron microscopical analysis. The main purposes of chemical fixation are to stop metabolic processes, to preserve cellular fine structure, and to stabilize the cells for subsequent steps in the preparatory procedure. In some studies, care must also be taken to preserve enzyme activity and/or tissue antigenicity. The choice of chemical fixation procedure requires careful consideration of three main factors:
- Selection of the fixing agent itself, e.g., glutaraldehyde, formaldehyde, osmium tetroxide, or mixtures or sequences thereof.
- Selection of the proper vehicle for the fixative, e.g., choice of buffer, pH, added salts, or other substances.
- Selection of the procedure for applying the fixative to the cells or tissues.
No single standard fixation method is suitable for all types of cells and tissues. The aforementioned three factors usually have to be adjusted for each specific cell type, tissue, or experimental situation and, consequently, a very large number of fixation procedures have been described. The literature on chemical fixation for electron microscopy is extensive (see Sabatini et al., 1963; Maunsbach, 1966a,b; Griffith, 1993; Glauert and Lewis, 1998; Maunsbach and Afzelius, 1999). It is nevertheless possible to point at some general principles and procedures with wide applicability. This chapter describes such procedures found useful for different applications in cell biology in our laboratory.
Tissues to be analyzed in the electron microscope are usually embedded in resins for ultramicrotomy. The embedding procedures vary with respect to chemical composition of resins, protocols for dehydration, and procedures for infiltration with resins, as well as the properties of the embedded tissue with respect to sectioning quality, tissue shrinkage, and tissue contrast in the electron microscope. Epoxy resins are the most commonly used embedding media in biological electron microscopy (Luft, 1961; Glauert and Lewis, 1998). They combine good ultrastructural preservation of the tissues, ease of sectioning, reproducibility, and relative ease of handling. However, they preserve tissue antigenicity only to a very limited extent. Acrylic resins, such as the Lowicryls (Carlemalm et al., 1985), provide both good ultrastructural preservation and preserve, to a larger extent, tissue antigenicity. Embedding in acrylic resins is carried out at low temperature either by progressively lowering the temperature during dehydration and resin infiltration or by cryofixation followed by freeze substitution and UV polymerization at low temperature (see article by Maunsbach).
II. MATERIALS AND INSTRUMENTATION
A. Fixation
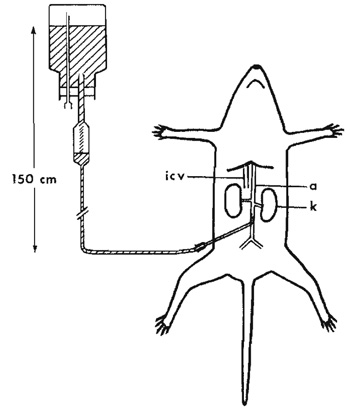 |
| FIGURE 1 Schematic drawing of perfusion fixation of rat through the abdominal aorta. The flask with the fixative and the drip chamber is placed about 150cm above the animal, a, aorta; icv, inferior caval vein; k, kidney. |
Agar (Merck 101615)
Glutaraldehyde, 25% aqueous stock solution EM grade (Merck 104239)
Sodium cacodylate (C2H6AsNaO2·3H2O, Merck Art 820670)
Osmium(VIII) tetroxide (Os04, 76028 Johnson Matthey Materials Technology)
Paraformaldehyde powder (Merck 104005)
Operating table
Anesthetic
Scissors, forceps, scalpels, and clamps for surgical procedures
Small forceps with fine claws
Gauze swabs
Plastic petri dishes
Thin razor blades
5- to 10-ml vials with lids for specimens
Gloves
Short-beveled syringe needle for perfusion of rat aorta, length about 50mm, outer diameter 1.3-1.5 mm
Blunt syringe needle for heart perfusion, length about 100 mm, outer diameter 2.0-2.4 mm
Perfusion set with drip chamber as used for intravenous blood infusions (Fig. 1)
Flask to which the perfusion set fits
10- to 15-cm-thick syringe needle to ventilate the flask
Stand to hold the fixative flask upside down about 150cm above the operating table
Adequate ventilation
B. Dehydration and Embedding in Epoxy Resin
Epoxy resin kit (TAAB TO24) containing epoxy resin (TAAB 812), dodecenyl succinic anhydride (DDSA), methyl nadic anhydride (MNA), and 2,4,6-tri(dimethylaminomethyl)phenol (DMP-30)
Ethanol
Maleic acid (C4H4O4, Merck 800380)
Uranyl acetate dihydrate [(CH3COO)2UO2·2H2O, TAAB 1001]
Propylene oxide (C3H6 O, Merck 112492).
5- to 10-ml glass vials with lids (Fig. 2a).
Gloves
 |
| FIGURE 2 Embedding in epoxy resin. (a) Vials with specimens during ethanol dehydration (left) and infiltration in pure epoxy resin (right). At the start of infiltration the tissue blocks are placed on top of the resin and allowed to sink to the bottom. (b) Flat embedding mold used for epoxy embedding. Specimens and labels are placed in the wells. The wooden stick (right) is used to orient blocks and labels in the resin. (c) Enlargement of central wells showing specimen and label without resin (below), specimen with label and epoxy (middle), and empty well (top). (d) Polymerized epoxy block with label seen from back side. |
Disposable Pasteur pipettes
Flat embedding molds in resistant rubber (G3690, Agar Scientific Ltd., Fig. 2b)
Fine forceps
Wooden stick
III. PROCEDURES
For many purposes, adequate fixation is obtained by simple immersion of small tissue pieces into the fixative solution. This is the only mode of fixation possible for many tissues and for biopsies. However, a more rapid and uniform fixation is usually obtained if the fixative solution is perfused via the vascular system, either through the heart or through the abdominal aorta (Fig. 1) or, in some cases, through the venous system. Perfusion fixation (Figs. 3a and 4) should be preferred over immersion fixation (Figs. 3b and 5) whenever possible. For most tissues, 1% glutaraldehyde is sufficient for general ultrastructural studies. This concentration does not require a preceding rinse of the vascular system with a salt solution. For cytochemical or immunocytochemical studies, 4% formaldehyde plus 0.1% glutaraldehyde is preferable (Fig. 3b), but the glutaraldehyde should be omitted if the enzymes or antigens are inhibited by glutaraldehyde.
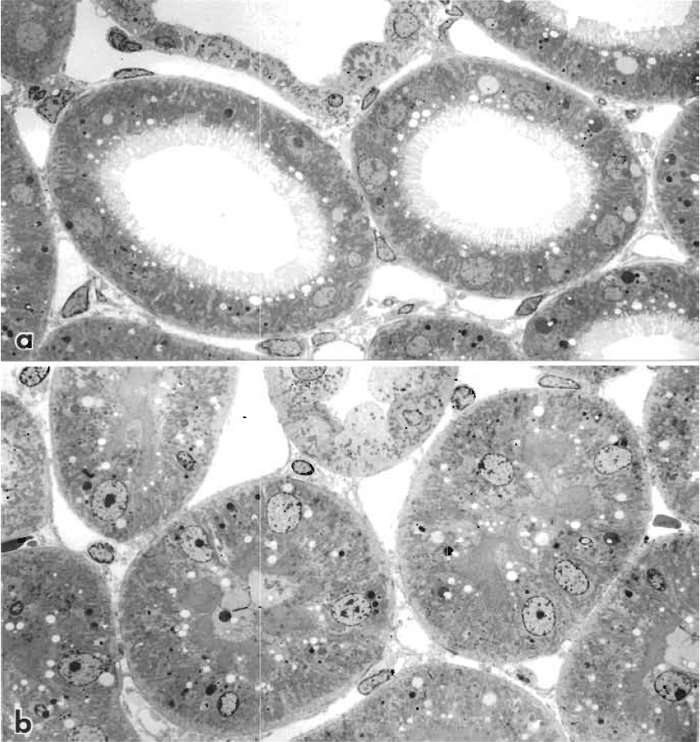 |
| FIGURE 3 Transmission electron micrograph of rat kidney cortex perfusion fixed through the abdominal aorta with 1% glutaraldehyde (a). Tubule lumens are open and brush borders of proximal tubules are arranged uniformly. (b) Comparable area of rat kidney cortex immersion fixed with 1% glutaraldehyde. All proximal tubules are collapsed with portions of cytoplasm occupying the tubule lumen, and nuclei have moved away from the basement membrane. Both specimens were postfixed in 1% osmium tetroxide in 0.1 M cacodylate buffer, block stained with 1% uranyl acetate in sodium maleate buffer at pH 5.5, dehydrated in ethanol, and embedded in Epon resin, and sections were double stained with uranyl acetate and lead citrate. 1200x. |
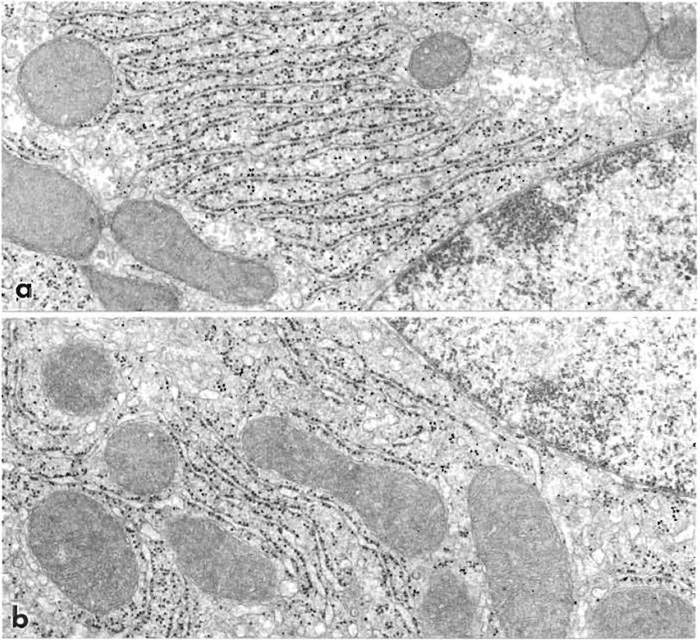 |
| FIGURE 4 Parts of liver cells from rats perfusion fixed through the heart with 1% glutaraldehyde (a) and 4% formaldehyde plus 0.1% glutaraldehyde (b). Cell ultrastructure is similar but small focal expansions of the endoplasmic reticulum occur (b). 32,500x. |
A. Perfusion Fixation of Rats through the Abdominal Aorta
The following procedure (Maunsbach, 1966a) results in efficient fixation of kidney, liver, pancreas, and small intestines. In the kidney, which is very sensitive to variations in the mode of applying the fixative, it preserves open tubules and normal relationships between tubule cells. The procedure is described for rats but can also be adapted for other animals.
Solutions
- 0.2M sodium cacodylate buffer: To make 1000ml, dissolve 42.8 g sodium cacodylate in 900ml of distilled water. Adjust pH to 7.2 with 1N HCl. Complete to 1000ml with distilled water.
- 0.1M sodium cacodylate buffer: Dilute 0.2M sodium cacodylate buffer with an equal amount of distilled water.
- 1% glutaraldehyde in 0.1M sodium cacodylate buffer: To make 500ml of fixative solution, mix 250ml 0.2M sodium cacodylate buffer and 20ml 25% aqueous glutaraldehyde and add distilled water to 480ml. Adjust pH to 7.2 with 0.1N NaOH or 0.1N HCl. Complete with distilled water to 500ml.
- 20% stock solution of formaldehyde: To make a 100- ml solution, mix 20g of paraformaldehyde powder with 80ml of distilled water in a glass flask. Heat to 60°C while gently agitating the milky solution. Add 1N sodium hydroxide dropwise until the solution clears up. Complete to 100ml with distilled water. This procedure should be carried out in a well ventilated hood and with protection for the face. The solution can be stored for a few days in the refrigerator.
- 4% formaldehyde plus 0.1% glutaraldehyde in 0.1M sodium cacodylate buffer for immunocytochemistry: To make a 500-ml solution, mix 100ml of 20% formaldehyde stock solution, 2ml 25% glutaraldehyde, and 250ml 0.2M sodium cacodylate buffer. Add distilled water to 480ml. Adjust pH to 7.2 with 0.1N NaOH or 0.1N HCl. Complete with distilled water to 500ml. For sensitive antigens, omit the glutaraldehyde.
- 2% osmium tetroxide stock solution: 1g crystalline osmium tetroxide is obtained preweighed in closed glass ampules. Wash the ampule carefully and score the vial around its perimeter with a diamond or a fine file. Break the vial cautiously and empty the crystals into 50ml of distilled water in a glass vial with a tight lid. The crystals dissolve very slowly and the solution should be prepared at least the day before use. Shaking and/or ultrasonic treatment speeds up the process. All steps should be carried out in a well-ventilated hood. Always wear gloves when handling osmium tetroxide solutions. The solution is stable if kept in the cold and protected from strong light.
- 1% buffered osmium tetroxide: To make 10ml of fixative solution, mix 5ml of 0.2M cacodylate buffer and 5 ml of 2% osmium tetroxide stock solution.
Steps
- Place the closed flask containing the fixative upside down about 150cm above the level of the aorta in the animal. The fixative has room temperature.
- Connect the flask to the perfusion needle via the administration set for intravenous solutions and ventilate the flask (Fig. 1).
- The size of the needle has a 1.3- to 1.5-mm outer diameter for a 300-g rat and is proportionally smaller for lighter animals. The needle is bent at an angle of about 45° with the beveled side out (i.e., down during perfusion).
- Connect the perfusion needle via the infusion set to the flask containing the fixative. Check that there are no air bubbles in the tubing of the infusion set.
- Fix the anesthesized animal onto the operating table with its back down. No artificial respiration is used.
- Open the abdominal cavity by a long midline incision with lateral extension and move the intestines gently to the left side of the animal.
- Carefully expose the aorta below the origin of the renal arteries and very gently free the aorta from overlaying adipose and connective tissues.
- Hold the wall of the aorta firmly with the small forceps with fine claws about 0.5-1.0 cm from its distal bifurcation. Insert the bent needle close to the forceps toward the heart into the lumen of the aorta (with the beveled side of the tip down).
- In very rapid succession (a) cut a hole in the inferior caval vein with fine scissors, (b) start the perfusion, and (c) clamp the aorta below the diaphragm, but above the origin of the renal arteries. When performing these manipulations, accuracy and speed are essential and the fixation procedure is preferably carried out by two persons. It is particularly important to clamp the aorta rapidly after the perfusion has been started. This is done most easily by compressing the aorta toward the posterior wall of the peritoneal cavity with a finger (wear gloves), which is then replaced by a clamp. Finally, cut the aorta above the compression.
- The kidney surface must blanch immediately and show a uniform, pale color. The flow rate should be at least 60-100ml/min for an adult rat. Perfuse for 3min. Stop the perfusion and excise and trim the tissues with a razor blade. Store the tissue in vials and immersion fix in the same fixative for 2h.
- Rinse the tissue two times for 30min in 0.1M sodium cacodylate buffer.
- Postfix the tissue in 1% osmium tetroxide for 1h in the cold. Swirl the vial occasionally to secure uniform penetration of the fixative.
- Rinse two times for 30min in 0.1M sodium cacodylate buffer. The tissue is now ready for dehydration and embedding.
B. Perfusion Fixation through the Heart
The following procedure provides fixation of most rat organs with 1% glutaraldehyde. For some organs the glutaraldehyde concentration should be increased (e.g., to 5% for the brain) and the fixative preceded by a brief rinse with a balanced salt solution such as Tyrode. For immunocytochemistry, use 4% paraformaldehyde with or without 0.1% glutaraldehyde.
Solutions
- 1% glutaraldehyde in 0.1M sodium cacodylate buffer: See Section III,A.
- 4% paraformaldehyde plus 0.1% glutaraldehyde in 0.1M sodium cacodylate buffer: See Section III,A.
- 0.1M sodium cacodylate buffer: See Section III,A.
Steps
- Place the closed flask containing the fixative upside down about 150cm above the level of the aorta in the animal.
- Connect the perfusion needle via the infusion set to the flask containing the fixative and ventilate the flask. Check that there are no air bubbles in the tubing of the infusion set.
- Fix the anesthetized animal onto the operating table with its back down.
- Open the thoracic cavity of the animal without giving artificial respiration.
- Grasp the heart close to its apex with a forceps. Cut a small hole in the wall of the left ventricle close to the apex with fine scissors. Rapidly insert a blunt syringe needle (2.0-2.4mm outer diameter for a 300-g rat and proportionally smaller for lighter animals) and move it into the ascending aorta. Place a clamp on the aorta to hold the needle.
- Cut a hole in the right atrium of the heart and start perfusion immediately.
- Check the flow rate in the drip chamber and flask. The flow rate should be at least 150ml/min for an adult rat. Perfuse for 3 min. Stop the perfusion and remove pieces of tissue. Subdivide the tissue and fix it additionally for 2h in the same fixative.
- Proceed as described earlier for perfusion fixation through the abdominal aorta (steps 11-13).
C. Immersion Fixation
Immersion fixation of tissues for general ultrastructural studies is carried out with i or 2% glutaraldehyde for small tissue blocks. If the size of the tissue in one dimension is about 0.5 mm or more, the concentration should be increased to 3%, which is recommended for renal biopsies. For large specimens, an alternative solution is 2% formaldehyde plus 2.5% glutaraldehyde fixative (Fig. 4b). For immunocytochemical studies, use 4% formaldehyde with or without 0.1% glutaraldehyde fixative. If the antigen is sensitive to fixation, glutaraldehyde should be excluded.
Solutions
- 1% glutaraldehyde in 0.1M sodium cacodylate buffer: See Section III,A.
- 3% glutaraldehyde in 0.1M sodium cacodylate buffer: To make 100ml of fixative solution, mix 50ml 0.2M sodium cacodylate buffer, 12ml 25% aqueous glutaraldehyde, and add distilled water to 90ml. Adjust pH to 7.2 with 0.1N NaOH or 0.1N HCl. Complete with distilled water to 100 ml.
- 4% formaldehyde plus 0.1% glutaraldehyde in 0.1M sodium cacodylate buffer: See Section III,A.
- 2% formaldehyde plus 2.5% glutaraldehyde in 0.1M sodium cacodylate buffer, often referred to as half-strength "'Karnovsky's fixative" (Karnovsky, 1965): To make 250 ml of fixative solution, mix 25ml 25% aqueous glutaraldehyde stock solution, 25 ml 20% formaldehyde stock solution, and 125ml 0.2M sodium cacodylate buffer; add distilled water to about 240ml and adjust pH to 7.2 with 0.1N NaOH or 0.1N HCl. Complete with distilled water to 250ml.
- 1% osmium tetroxide in 0.1M sodium cacodylate buffer: See Section III,A.
- 0.1M sodium cacodylate buffer: See Section III,A.
Steps
- Cut out a piece of tissue from the organ under study and place it in a precold, empty petri dish.
- Hold the tissue gently with a forceps and cut thin slices with a thin razor blade using sawing movements. The slices should not exceed 0.5 mm in thickness. Great care should be taken not to strain the tissue mechanically. Areas where the forceps have touched the tissue should be discarded.
- Trim the slices to less than than 0.5 x 5 x 5 mm and immerse them into the fixative solution.
- Swirl the vial occassionally during fixation to secure uniform penetration of the fixative from all sides into the tissue. Fixation should last at least 2 h. In most cases the temperature of the fixative is not important. Initial fixation can be carried out at room temperature and followed by fixation in the cold.
- Trim down the dimensions of the tissue slices while in the fixative solution in order to get small blocks suitable for embedding. It is absolutely essential that only tissue from the surface of the tissue is used, as the quality of fixation deteriorates with increasing distance from the surface of the immersion fixed slice (Fig. 5).
- Proceed as described earlier for perfusion fixation through the abdominal aorta (see Section III,A, steps 11-13).
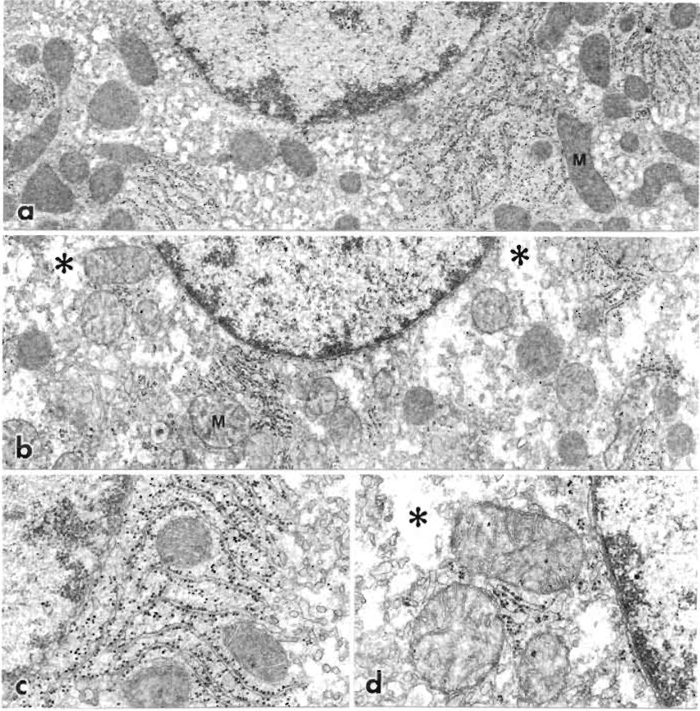 |
| FIGURE 5 Liver cells fixed by immersion in 1% glutaraldehyde and observed in a section cut at a right
angle to the liver surface. (a) The cell is located at the very surface of the liver. (b) The cell is located about
200 µm from the surface and thus fixed with some delay. The cytoplasm of the superficial cell, shown at higher
magnification (c), is well preserved, but the cytoplasm of interior cells shows evidence of cell swelling with
almost empty regions (*). Mitochondria (M) are well preserved (a, c), but dilated with a partly empty matrix
(b and d). a and b: 15,000×; c and d: 32,500×. |
D. Fixation of Tissue Cultures
Solutions
- 2% glutaraldehyde in 0.1M sodium cacodylate buffer: To make 100ml, mix 50ml 0.2M sodium cacodylate buffer, 8 ml 25% glutaraldehyde, and 30 ml distilled water. Adjust pH to 7.2 with 0.1N NaOH or 0.1N HCl. Complete with distilled water to 100ml.
- 0.1M sodium cacodylate buffer: See Section III,A.
Steps
- Gently decant the tissue culture medium.
- Immediately add 2% glutaraldehyde in 0.1mM cacodylate buffer. Very gently swirl the fixative in the culture dish.
- Fix for 1h.
- Proceed as described earlier for perfusion fixation through the aorta (see Section III,A, steps 11-13).
E. Fixation of Cell Suspensions
Solutions
- 2% glutaraldehyde in 0.1M sodium caocdylate buffer: See Section III,D.
- 2% agar in 0.1M sodium cacodylate buffer: Dissolve during stirring 2g agar in 100ml 0.1M sodium cacodylate buffer. Heat to close to 100°C until dissolved.
Steps
- Mix the cell suspension rapidly with an equal volume of 2% glutaraldehyde in 0.1M cacodylate buffer.
- Fix for 1h.
- Sediment the cells in a centrifuge tube by centrifugation at approximately 1000g for 5min. Decant the supernatant.
- Resuspend the cells in an excess of 0.1M cacodylate buffer. Repeat step 3 after 15 min.
- Add 1% osmium tetroxide in 0.1M cacodylate buffer and resuspend the cells. Fix for 30min. Repeat step 3.
- Add 0.1M sodium cacodylate buffer and resuspend the cells. Repeat step 3.
- To the pellet add an equal volume of 2% agar in 0.1M sodium cacodylate buffer, which has been heated to about 40°C. Mix the agar and the pellet rapidly with a fine glass rod. Allow the pellet to cool. Thereafter treat the pellet as a tissue block during dehydration and further processing. Take care not to resuspend the cells.
F. Dehydration and Embedding in Epoxy Resin
The following procedure results in embedded tissue blocks with good cutting properties from a variety of tissues. It includes en bloc staining with uranyl acetate, which improves contrast in subsequent section staining. If en bloc staining is not desired, steps 2-4 should be omitted (compare Figs. 6a and 6b).
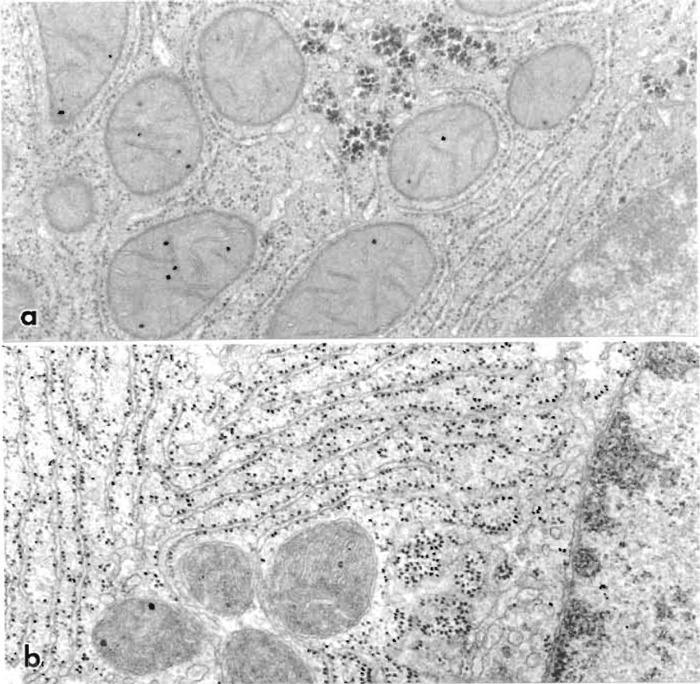 |
| FIGURE 6 Electron micrographs of cells in liver perfusion fixed with 1% glutaraldehyde, postfixed in osmium tetroxide, and embedded in epoxy resin. (a) Embedding without en bloc staining but section staining with lead citrate. This preparation gives a good overall image of subcellular architecture. (b) Same fixation and embedding except that the tissue was en bloc stained with uranyl acetate and the section was double stained with uranyl acetate and lead citrate. The micrograph shows considerable contrast with emphasis on membranes, ribosomes, and nuclear components. 40,000×. |
Solutions
- 70, 90, and 95% ethanol in water
- 0.05M maleate buffer: To make 100ml, dissolve 0.58 g maleic acid in about 80ml water and adjust pH to 5.2 with 1N NaOH. Fill up to 100ml with water.
- 0.5% uranyl acetate in 0.05M sodium maleate buffer: To make 100ml, dissolve 0.58g maleic acid in 80ml water and adjust pH to 6.0 with 1N NaOH. Dissolve 0.5g uranyl acetate dihydrate in this solution and adjust (if necessary) pH to 5.2 with NaOH. Fill up to 100 ml with water.
- Epoxy resin: To make 100g resin, mix 48g TAAB 812, 19g DDSA, and 33g MNA. Stir continuously for 5min. Add 2g DMP-30 and stir continuously for another 5 min. The complete epoxy mixture should be used for initial infiltration within the next few hours, as it will slowly start to polymerize at room temperature. The freshly mixed complete resin can be stored in the freezer (e.g., -20°C) for months in closed vials. The vials must attain room temperature before being opened and used for embedding.
Steps
- Rinse tissue fixed in aldehydes and/or osmium tetroxide for 2 x 30 min in buffer (e.g., same buffer used for fixation). Keep the tissue at 0-4°C until step 6. If en bloc staining is not desired, proceed to step 5.
- For en bloc staining, rinse for 2 x 15min with sodium maleate buffer. As in all the following steps up to step 10, remove fluid with a Pasteur pipette before adding new fluid. The tissue must never be allowed to dry.
- Stain for 60min in uranyl acetate in maleate buffer.
- Rinse for 2 x 15 min in sodium maleate buffer.
- Dehydrate for 2 x 15 min in 70% ethanol.
- Dehydrate for 2 x 15min in 90% ethanol. This and the following steps of dehydration and infiltration are carried out at room temperature.
- Dehydrate for 2 x 15 min in 95% ethanol.
- Dehydrate for 2 x 15min in absolute ethanol. Repeat for large specimens.
- Place the tissue for 2 x 15 min in propylene oxide, which acts as a transition medium. Take particular care that the tissue does not dry, as propylene oxide evaporates very rapidly. Because propylene oxide is toxic and very volatile, this and all subsequent steps should be carried out in a well-ventilated hood with gloves.
- Infiltrate the tissue for 60min in a mixture of 50% propylene oxide and 50% completely mixed epoxy resin.
- Transfer the specimens to the surface of the epoxy resin in a clean vial containing 100% resin (Fig. 2a). Use a fine forceps or a wooden stick. Propylene oxide gradually diffuses out of the tissue blocks when they sink through the resin. Leave the specimens in the epoxy resin overnight at room temperature.
- Fill the flat embedding mold with epoxy resin (Fig. 2b). Place a small piece of paper with the identification number of the specimen upside down in the resin next to the specimen (Figs. 2c and 2d). If necessary, adjust the location of the tissue block and/or the paper with a wooden stick.
- Polymerize the specimens at 60°C for 2 days.
IV. COMMENTS
- Chemicals used in fixation for electron microscopy, notably aldehydes, osmium tetroxide, and cacodylate, are toxic and should be handled with adequate safety precautions. Exposure to formaldehyde may lead to allergic reactions. Also, chemicals used during dehydration and embedding in epoxy or acrylic resins are toxic (mutagenic, allergenic, and, in some cases, perhaps carcinogenic) and should be handled with adequate safety precautions (Ringo et al., 1982). Work in a well-ventilated hood and use gloves. Note that resins can penetrate most types of gloves within a short time.
- For immunocytochemistry the sensitivity of the antigen to aldehydes determines the compositions of the fixative. As a rule of thumb, insensitive antigens can be fixed with 1% glutaraldehyde, sensitive antigens with 4% formaldehyde plus 0.1% glutaraldehyde, and very sensitive antigens with 4% formaldehyde only. In the latter case the formaldehyde concentration may be increased to 8%.
- Cells tend to swell if the osmolality of the fixative vehicle (buffer) is low, whereas they shrink if the fixative solution has a high solute concentration (Maunsbach, 1966b). For this reason the osmotic composition of the fixative vehicle has to be adjusted for some tissues. In the outer renal medulla, where extracellular osmolality is high, the normal perfusion fixative (1% glutaraldehyde in 0.1M cacodylate buffer) should be supplemented with 0.2M sucrose, whereas for amphibian tissues, the vehicle osmolality should be decreased slightly.
- The pH of aldehyde fixatives is normally 7.0-7.5 and fine adjustments of pH are not crucial in most ultrastructural studies. The choice of buffer in the fixative may influence the appearance of the tissue but in most tissues only to a moderate degree. Phosphate buffers are often used instead of cacodylate but in some tissues give a fine precipitate at concentrations around 0.1M or more.
- In highly vascularized organs, such as the pancreas, perfusion fixation leads to a distension of the extravascular space. Such swelling can be prevented by the addition of 2% dextran (molecular weight around 40,000) to the perfusion solution (Bohman and Maunsbach, 1970).
- Storage of cells and tissues in glutaraldehyde fixatives has very little influence on the final appearance of the tissue in the transmission microscope. Except for immunocytochemical studies, the preparation procedure can be halted for days, sometimes even months, while the tissue is in the aldehyde fixative. Pieces of aldehyde-fixed tissue can therefore be transported easily in fixative between laboratories.
- The protocol for ethanol dehydration in connection with epoxy resin embedding can be varied considerably without great effects on the final result. In most cases, short dehydration times seem preferable but storage of the specimens overnight at 4°C is usually without problems.
- Acetone is often used as an alternative to ethanol for dehydration but the results are in most cases essentially the same. Both ethanol and acetone dehydration lead to extraction of tissue lipids and shrinkage of tissue dimensions. These effects vary between tissues and may be slightly different in different protocols but cannot be eliminated.
- The chemical composition of epoxy resins from different manufacturers varies considerably (see Mollenhauer, 1993; Glauert and Lewis, 1998). Consequently, the properties of the different epoxy resins also vary with respect to viscosity and flow rate, hardness after polymerization, stainability, and stability in the electron beam. However, ultrastructural observations using presently available epoxy resins are quite comparable and in fact are often indistinguishable.
- The hardness of the polymerized epoxy blocks can be modified by changing the ratio of DDSA/MNA in the epoxy-embedding medium. Thus, an increase of DDSA gives softer blocks and an increase of MNA given harder blocks. However, adjustment of the anhydride: epoxide ratio is not necessary, although this was previously considered important for controlling the properties of the resin. While polymerization is normally carried out at 60°C, a higher curing temperature (80-100°C) can be used for very rapid polymerization, although this may lead to structural derangement of membranes.
V. PITFALLS
- If the fixative flow is compromised during perfusion fixation, sufficient concentration of fixative is not obtained throughout the tissue and cells may undergo various abnormal alterations before they are fixed. In a successful perfusion the surfaces of the organs blanch very rapidly, the kidney surface within less than a second, and the tissues harden quickly. There is usually a good correlation among the speed of tissue blanching, fixative flow as observed in the drip chamber, absence of blood in dissected tissues, and final quality of tissue preservation as observed in the electron microscope.
- It is very important that the tissues are not damaged mechanically when dissected and trimmed before immersion fixation or after fixation. Small pieces cut out with a razor blade should only be transferred between vessels with a fine forceps holding onto corners of the tissue blocks or with a Pasteur pipette.
- Following immersion fixation it is necessary to secure that the tissue analyzed in the electron microscope originates from the surface layers of the tissue block, as there is a gradient in the quality of fixation from the surface to the center of the block (Fig. 4). In the center of tissue slices, where the fixative has arrived with some delay, there is swelling of cytoplasm and organelles. Thus, before cutting thin sections it is practical first to examine thick (1-3 µm) sections of the same tissue block by light microscopy to select the optimal location of tissue for electron microscope analysis.
- Difficulties in sectioning of tissue embedded in epoxy resin are often due to soft resin blocks. This condition may originate from one or more deviations from the dehydration/infiltration protocol: (a) Wrong epoxy resin composition, (b) insufficient stirring of the components of the resin, (c) too short an infiltration time in pure resin, (d) too large a specimen (all dimensions exceeding 1 mm), (e) too short a polymerization time, (f) incomplete dehydration, or (g) incomplete removal of ethanol.
References
Bohman, S.-O., and Maunsbach, A. B. (1970). Effects on tissue fine structure of variations in colloid osmotic pressure of glutaraldehyde fixatives. J. Ultrastruct. Res. 30, 195-208.
Carlemalm, E., Villiger, W., Hobot, J. A., Aceearin J.-D., and Kellenberger, E. (1985). Low temperature embedding with Lowicryl resins: Two new formulations and some applications. J. Microsc. 140, 55-63.
Glauert, A. M., and Lewis, P. R. (1998). Biological specimen preparation for transmission electron microscopy. In "Practical Methods in Electron Microscopy" (A. M. Glauert, ed.), Vol. 17. Portland Press, London.
Griffiths, G. (1993). "Fine Structure Immunocytochemistry." Springer-Verlag, Berlin.
Karnovsky, M. J. (1965). A formaldehyde-glutaraldehyde fixative of high osmolality for use in electron microscopy. J. Cell Biol. 27, 137A.
Luft, J.H. (1961). Improvements in epoxy resin embedding methods. J. Biophys. Biochem. Cytol. 9, 409-414.
Maunsbach, A. B. (1966a). The influence of different fixatives and fixation methods on the ultrastructure of rat kidney proximal tubule cells. I. Comparison of different perfusion fixation methods and of glutaraldehyde, formaldehyde and osmium tetroxide fixatives. J. Ultrastruct. Res. 15, 242-282.
Maunsbach, A. B. (1966b). The influence of different fixatives and fixation methods on the ultrastructure of rat kidney proximal tubule cells. II. Effects of varying osmolality, ionic strength, buffer systems and fixative concentration of glutaraldehyde solutions. J. Ultrastruct. Res. 15, 283-309.
Maunsbach, A. B., and Afzelius, B. A. (1998). "Biomedical Electron Microscopy. Illustrated Methods and Interpretations." Academic Press, San Diego.
Mollenhauer, H.H. (1993). Artifacts caused by dehydration and epoxy embedding in transmission electron microscopy. Microsc. Res. Technique 26, 496-512.
Ringo, D. L., Brennan, E. F., and Cota-Robles, E. H. (1982). Epoxy resins are mutagenic: Implications for electron microscopists. J. Ultrastruct. Res. 80, 280-287.
Sabatini, D. D., Bensch, K., and Barnett, R. J. (1963). Cytochemistry and electron microscopy. The preservation of cellular ultrastructure and enzymatic activity by aldehyde fixation. J. Cell Biol. 17, 19-58.
Support our developers


