Use of Ultrathin Cryo- and Plastic Sections for Immunocytochemistry
The identification of cell surface and intracellular molecules for light and electron microscopic observations is an important technique for studying their location and function in the cell. A wide range of methods has therefore been developed to identify and localize molecules at the subcellular level. The term "immunocytochemistry" describes a set of methods that use molecules with specific binding ability to other molecules. The binding molecules, called "affinity markers," are diverse, but have in common the ability to specifically bind, and thus identify, other molecules. One special class of affinity markers that are widely used are antibodies. These are produced naturally by mammals and can be produced to bind to a large range of molecules, called antigens (e.g., a protein in the cell membrane) for indirect visualization. The antibodies are applied to specimens so that they will bind to its target molecules. For examination in an electron microscope, the antibody molecules are subsequently labelled with an electron-opaque marker, usually colloidal gold. However, for light microscopic examination, the use of fluorescent markers is recommended. As a prerequisite, these methods have to ensure the accessibility of the antigen to the antibody, preferably without compromising either the structure or the original localization of the target molecule. For electron microscopic examination, the specimen has to be thin (usually ultrathin sections of 50-100nm), stained (heavy metal salts), dehydrated, and embedded in a supporting and stabilizing matrix.
The term "postembedding" refers to techniques in which the material of interest (may it be tissues, cells, or purified organelles) is usually either frozen rapidly or fixed chemically, embedded in either a resin or a concentrated solution of cryoprotectant, and hardened by either polymerizing the resin or freezing the cryoprotected sample in order to be sectioned. Sections are subsequently labelled using specific antibodies and a visualization marker. There is now a general consensus that the labelling of sections is the best general approach to take for any immunocytochemical study (for more theoretical background, see Griffiths, 1993). The two most important advantages of postembedding over preembedding are (1) when the labelling is carried out on thin sections, the whole surface of the section has equal access to the reagents and (2) there is significantly less need to improve the accesibility of the reagents to the antigen by using a permeabilization protocol, which may destroy fine structural details or even remove or redistribute the antigen under study. This article discusses the practical aspects involved in the labelling of thin sections for electron microscopy. Essentially all the reagents mentioned are widely available from all EM supply companies.
A. Conventional Preparation Procedures
For conventional electron microscopy preparation procedures, the cells or tissues are fixed chemically using aldehydes (e.g., glutaraldehyde and/or formaldehyde). This is usually followed by postfixating with osmium tetroxide, dehydrating in an organic solvent (ethanol or acetone), and subsequent embedding in a hydrophobic, epoxy resin such as Epon or Spurr. The resin is polymerized at elevated temperatures (60° to -70°C), and the cured, hardened blocks are sectioned at room temperature. The ultrathin sections are placed on metal support grids, stained using heavy metal salt solutions (uranyl acetate/lead citrate) and observed in the electron microscope. In general, because of the harsh treatment applied to the specimens, this approach is not useful for immunolabelling. However, there are exceptions to this statement. The most striking example of this involves an extensive and elegant series of studies by Ottersen and colleagues (1992) who performed immunolocalization experiments of amino acid neurotransmitters in brain tissue.
During the 1980s a new class of acrylic or methacrylate- based resins were developed for immunocytochemistry. The two key advantages of these resins over epoxy-based resins are that they are more hydrophilic and, in some cases, can be polymerized at low temperatures. There are two main "families" of these resins, namely Lowicryl resins and London resins (LR). In conjunction with the cryosectioning technique pioneered by Tokuyasu (1973, 1978), these resins have become widely and successfully applied for immunolabelling since the early 1990s. We will now point out the key practical features involved in using these two approaches.
London resins are perhaps the simplest to use, as in the case of LR white, the resin can be heat polymerized. Both LR white and LR gold are now widely used, and the manufacturers give detailed instructions on their use. A protocol for LR gold is as follows. In this example, infiltration and embedding are carried out at low temperature:
Solutions
- 0.1M phosphate-buffered saline (PBS) buffer, pH 7.4: To make 1 liter, dissolve 2.25g of Na2HPO4·2H2O, 0.257g of NaHPO4·H2O, and 8.767g NaCl in 1000 ml distilled water
- 0.5M ammonium chloride: To make 1 liter, dissolve 26.75 g of NH4Cl in 1 liter PBS
- Fix tissue pieces (less than 1 mm3) with the fixative of your choice, e.g., 0.5% glutaraldehyde in phosphate buffer for 30min to 2h [note that for all immunocytochemical techniques the fixation step is critical [see Griffiths (1993) for discussion)].
- Immerse in 0.5M ammonium chloride in PBS (to quench free aldehyde groups) for 30min.
- Immerse in PBS for 15-60min.
- Immerse in 50% (vol) methanol at 0°C for 10min.
- Immerse in 80% (vol) methanol at -20°C or at 4°C for 60 min.
- Immerse in 90% (vol) methanol at -20°C or at 4°C for 60 min.
- Immerse in methanol and LR gold (1:1) at -20°C or at 4°C overnight.
- Immerse in methanol and LR gold (1:2) at -20°C or at 4°C for 4h.
- Immerse in pure LR gold resin at -20°C or at 4°C for 2 h.
- Immerse in pure LR gold resin + catalyst at -20°C or at 4°C for 2h.
- Immerse in pure LR gold resin + catalyst at -20°C or at 4°C overnight.
- Immerse in pure LR gold resin + catalyst at -20°C or at 4°C and polymerize for 24h.
C. Progressive Lowering of Temperature (PLT) in Lowicryl Resins
The specimen is fixed chemically with aldehydes (postfixation with osmium tetroxide is omitted, as it can interfere with the polymerization process) and dehydrated with increasing concentrations of alcohol. During dehydration the temperature is lowered progressively to finally reach -25 to -35°C. Infiltration of the specimens with resin and subsequent polymerization can be performed at low temperatures, as Lowicryl resins have been designed to have an extremely low viscosity at low temperatures and can be polymerized using UV light instead of heat. The blocks can be sectioned at room temperature using standard equipment. The PLT method preserves antigenicity much better than conventional preparation methods and has been used extensively. A PLT regime is summarized here.
Steps
- Use any of the standard aldehyde fixation procedures.
- Immerse in 30% (vol) ethanol at 0°C for 30min.
- Immerse in 50% (vol) ethanol at -20°C for 60min.
- Immerse in 70% (vol) ethanol at -35°C (-50°C) 1 for 60 min.
- Immerse in 95% (vol) ethanol at -35°C (-50°C to -70°C) 1 for 60min.
- Immerse in 100% (vol) ethanol at -35°C (-50 to -70°C) 1 for 60min.
- Immerse in 100% (vol) ethanol at -35°C (-50 to -70°C) 1 for 60min.
- Immerse in ethanol and resin (1:1) at -35°C (-50 to -70°C) 1 for 60min.
- Immerse in ethanol and resin (1:2) at -35°C (-50 to -70°C) 1 for 60min.
- Immerse in pure resin at -35°C (-50 to -70°C) 1 for 60 min.
- Immerse in pure resin at -35°C (-50 to -70°C) 1 overnight.
- Polymerize for 2 days at low temperature (-50 and -70°C, respectively) 1 with UV light.
The whole procedure can be performed with homemade equipment or, more reproducibly, using commercially available systems from Balzers or Leica microsystems Inc.
1 for HM23 and K11M.
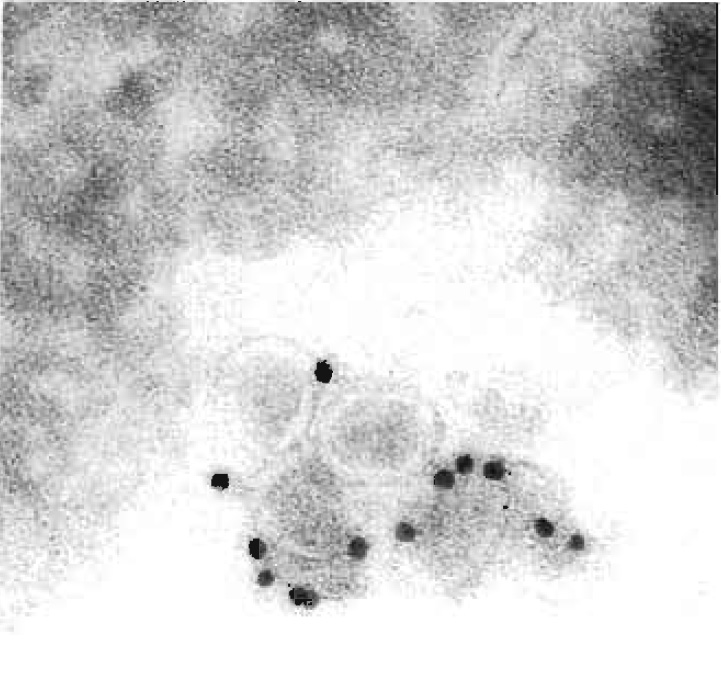 |
| FIGURE 1 Cryoimmuno-EM of BHK-21 cells incubated with equine arteritis virus (EAV), Bucyrus strain. Cells were fixed, sectioned, and labelled for the EAV surface glycoprotein GP5. Bar: 0.2 mm. |
1. Rapid Freezing
Chemical fixation of biological specimens is invariably prone to lead to the formation of artifacts. These artifacts can be avoided if biological structures are physically fixed by very rapid freezing. Rapid freezing is a prerequisite for obtaining a frozen specimen that is not destroyed by ice crystals, which would inevitably grow at too low cooling rates. Typically, biological specimens have to be cooled at a rate of 105K/s in order to obtain vitrification, i.e., a state of ice in the cell that is amorphous, i.e., lacks ice crystals. Different freezing techniques have been developed to achieve this goal and the reader is referred to Robards and Sleyter (1985) and to Roos and Morgan (1989) for detailed descriptions of the available methods. However, to summarize, it is possible to freeze biological specimens rapidly with most of the available freezing techniques, provided that they are thin enough (virus suspensions, etc.). The only freezing method that allows bulk specimens to be vitrified is the high-pressure freezing technique (see Studer et al., 1989; Dahl and Staehlin, 1989).
Bulk-vitrified specimens can be subjected to a dehydration regime called freeze substitution. In this procedure, the vitrified ice is slowly substituted by an organic solvent, preferably at low temperatures. The cold organic solvent is then subsequently replaced by a suitable resin that is kept at temperatures between -40 and -85°C, followed by polymerization with UV light at the same temperature. The resulting resin blocks can be sectioned and the sections labelled at room temperature. However, high-pressure freezing devices are not standard equipment for the average electron microscopy facility and one may have to resort to a method that allows vitrification of the specimen at lower cooling rates by employing cryoprotectants, such as sucrose. Cryoprotectants used at reasonably high concentrations will prevent the formation of ice crystals in the specimen even at very low cooling, such as those achieved by immersion in liquid nitrogen. However, in order to allow the cryoprotectant to infiltrate the entire specimen, it has to be fixed chemically prior to infiltration. A freeze-substitution schedule for Lowicryl HM20 (van Genderen et al., 1991) is as follows.
Solution
2.3M sucrose solution in PBS: To make 500ml, dissolve 393.64 g of sucrose in PBS and adjust volume to 500ml
- Fix cell pellets and grow cells on filters or tissue (e.g., with 4% formaldehyde ± 0.1% glutaraldehyde in buffer) for 1 h. A recommended alternative is to add the fixative for 5-10min to the culture medium at the culture temperature before switching to having the fix in a buffer.
- Infiltrate the specimen with a cryoprotectant (e.g., 2.3M sucrose) for 30-60 min depending on its size.
- Cut specimen into small pieces (no more than 1 mm3).
- Mount specimen on specimen stubs and freeze in liquid nitrogen.
- Transfer to methanol at -90°C supplemented with 0.5% uranyl acetate for 36 h.
- Raise temperature to -45°C (at about 5°C/h).
- Rinse several times with fresh methanol at -45°C.
- Infiltrate with Lowicryl HM20 in the following series of Lowicryl/methanol mixtures: 1 : 1 for 2 h, 2:1 for 2h, pure Lowicryl for 2h, and than overnight.
- Polymerize for 2 days at -45°C with UV light.
- Section block at room temperature using a glass or preferably a diamond knife in an ultramicrotome.
- Label with antibodies and gold (see later); all subsequent steps are done by floating the grids on drops as small as 5 µl.
- Stain with 4% aqueous uranyl acetate for 10min.
- Rinse with distilled water.
- Stain with lead citrate for 1-5 min.
- Rinse in water, dry, and examine.
The thawed frozen section technique offers a number of advantages over most other methods for high-resolution immunolabelling. For more details, see Griffiths (1993).
- It is potentially the most sensitive technique for immunolabelling, as initial aldehyde fixation is the only denaturation step for the antigen (freezing and thawing of the specimen do not seem to affect the antigenicity)
- Because the sections are not embedded in resin, they offer the highest access of the antigen to the antibody relative to other techniques. Consequently, this approach is the most sensitive one for those antigens that are retained in the section; this is an important point, as many small soluble antigens may be very difficult to maintain in the sections.
- The possibilities for staining/contrasting are greater than for any other method.
- The entire procedure, including photographic documentation, can be performed in one working day.
Solution
Sucrose/PVP infusion mixture: To make 100ml, prepare a paste consisting of 20g of PVP, 4ml of 1.1M Na2CO3 in a buffer such as 0.1M phosphate (Na2HPO4) (total volume 20ml), prepare 80ml of 2.3M sucrose in the same buffer, mix the paste and the sucrose solution thoroughly, cover the mixture and leave at room temperature overnight so that minute air bubbles can escape, and adjust pH to neutrality using 1M NaOH (use pH indicator paper).
Sections are picked up using a wire loop (any pliable metal with a diameter of 1-2mm) containing a drop of 2.3M sucrose in PBS. Ideally, the sucrose is still fluid at the moment it makes contact with the section(s). The surface tension of the fluid will help stretch the compressed and wrinkly section(s). (Note: Stretching will not occur if picking up is done with an already frozen droplet, even if it is subsequently warmed up to room temperature.) Sections picked up in this way have one face exposed to the sucrose and the other face to the air. The latter will stick avidly to the surface of a formvar/carbon-coated EM specimen grid or a glass slide. One significant problem with pure sucrose pick up is that some parts of cells, notably the Golgi complex and endosomes, tend to overstretch during the picking up stage. In order to reduce the magnitude of this problem, Liu et al. (1996) developed the technique of picking up sections with a loop containing a 1:1 mixture of methyl cellulose (exactly the same solution used for embedding, see later) and 2.3M sucrose. This is now the method of choice for picking up cryosections. One added advantage of retrieving sections with the sucrose/methyl cellulose mixture is that they can be stored, attached to specimen grids, and covered with dried sucrose/methyl cellulose for up to 6 months (Griffith and Postuma, 2002).
Solution
0.2% methyl cellulose solution: Mix low-viscosity (25centipoise) methyl cellulose powder with cold triple-distilled water to make a 2% solution, leave refrigerated (methyl cellulose is more soluble at low temperatures) for 2-3 days, centrifuge the mixture at 100,000g at 40°C for 1 h, store the solution in the fridge, where it will be stable for up to 6 weeks, and mix nine parts of the solution with one part of a 3% solution of uranyl acetate in water for contrasting/embedding
Use the following a labelling procedure for electron microscopy, in all cases, float the grids on drops (as little as 5µl) on a strip of parafilm. The upper (nonsection) side of the grids must be kept clean and dry, while the lower surface, with sections attached, should always be kept hydrated.
- Collect grids by floating them on 1-5% fetal calf serum(FCS)/PBS on ice; wash in PBS once before going further. Note that many other reagents can be used to block nonspecific binding of antibodies such as 1% fish skin gelatin or 2% gelatin.
- If the cells have been glutaraldehyde fixed, free aldehyde groups can be quenched in 0.02M glycine in 5-10% FCS/PBS for 10min; rinse twice in PBS for a total of 5 min.
- Centrifuge antibody solution (lmin at 13,000g), dilute in 1-5% FCS/PBS, and incubate sections for 15-60min. Use the highest concentration of antibody that does not give background labelling over structures that do not contain the antigen.
- Wash six times in PBS for a total of 15 min.
- Incubate grids in protein A-gold for 20-30min. Dilute protein A-gold in 1-5% FCS/PBS. The concentration is critical. Too high a concentration gives nonspecific binding.
- Wash six times in PBS for a total of 25 min.
- Wash four times in distilled water for a total of 5 min.
- Incubate three times with 2% methyl cellulose solution (25cp) containing 0.1-0.4% uranyl acetate for 10-20min (on ice!).
- Pick the grid up with a 3-mm loop and remove excess fluid with filter paper.
- Air dry the grid suspended in the loop.
- The thickness of the methyl cellulose film determines the contrast and the extent of drying artefacts.
- The grids can now be examined.
III. COLLOIDAL GOLD
Colloidal gold coupled to antibodies or other affinity markers is now the marker of choice for EM immunolabelling, as it is very electron opaque and easily prepared reproducibly in a range of sizes. The gold particles can be conjugated to antibodies directly or to protein A. We prefer the latter, as we find it more stable and reproducible than IgG gold. However, a disadvantage of protein A is that it binds strongly only to certain species of IgG (rabbit, human, pig, and guinea pig always work; for a more detailed list, see Griffiths, 1993). When using a species of antibody that binds poorly (such as those from rat and mouse), an intermediate antibody step, such as a rabbit antimouse antibody, extends the usefulness of protein A gold. These reagents are now widely available from many commercial sources. For more details on the preparation of colloidal gold markers, see Griffiths (1993).
One common reason why EM methods are not applied more routinely is the amount of time and effort required to obtain a result. In recent years there have been many experiments using microwave ovens to aid in chemical fixation and embedding protocols. Although the effect of microwaves on biological specimens is still not fully understood, it is clear that routine embedding into epoxy resin or LR white is possible in less than 4h (Giberson and Demaree, 1999).
- There is no labelling. The first thing to consider is to try immunolabelling with a light microscopical approach (e.g., cryostat sections). If thick sections of lightly fixed specimens do not work (provided the secondary, visualizing antibodies are good), there is usually no point in continuing to the EM level. One exception to this statement is for small antigens that may be lost during the preparation for light microscopy. For these it is better to use an embedding approach, perhaps after freeze substitution. Provided one has a strong positive, specific signal at the LM level, a negative result at the EM level can be due to a number of reasons. In the case of plastic (e.g., Lowicryl) sections, a common reason is that the antibody has no access to the fixed antigen on the surface of the section. Usually, this is less of a problem with thawed cryosections. In the latter approach, fixation conditions can be reduced drastically (e.g., 5 min in 2% formaldehyde). While this will deleteriously affect the structure, it will help the investigator to decide if the problem is due to the fixation preventing access to the antigen. A second reason for a negative signal at the EM level, already alluded to, is that the antigen may have been washed away during the rinsing steps. This is a problem for small molecules, especially with the Tokuyasu approach. In this case one should crosslink the cells/tissues more severely (1-2% glutaraldehyde). For such antigens the resin approach is preferred. The third reason for lack of labelling is the quantitative aspect: the concentration of the antigens may be too low to detect. Note that the surface of a thin section provides a very small amount of antigen for the antibody when compared to, say, a whole cell at the immunofluorescent level. For more details, see Griffiths (1993).
- There is too much labelling/"nonspecific" binding. Both the antibody and the gold may not have been diluted sufficiently. It is best to use a standardized gold reagent at its optimal concentration with a characterized primary antibody. If both are unknown, measure the OD520 of the diluted gold reagent (e.g., a 1 : 100 to 1:500 dilution). The commonly used range of final concentration gives an adsorbance of 0.1 at a 520- nm wavelength (generally 1:10 to 1:100 final concentration). The optimal concentration is the highest that does not give background labelling in the absence of a primary antibody. When the gold concentration has been standardized, combine this with a dilution series of the antibody and use the highest concentration that does not give background labelling. The definition of background is, of course, at the discretion of the investigator and assumes some knowledge of the antigen: a membrane protein, for example, would not be expected in the nucleoplasm. Background labelling can often be due to impurities in the antiserum. In this instance, the only solution is to purify the antibody, either by preparing an IgG fraction (e.g., ammonium sulfate precipitation) or by affinity purification. It should be noted that the latter approach often results in a significant, or even total, loss of the highest titre antibody molecules (they remain on the column during the elution procedure).
A positive signal in immuno-EM is only significant when independent proof is provided that the gold labelling one sees is really due to the antigen of interest. Such proof of specificity should be obtained by two different approaches (for more detail, see Griffiths 1993).
- Immunochemical characterization to show that the antibody recognizes the antigen using an independent method such as immunoblotting or immunoprecipitation.
- Biological proof of specificity. The best control here is to be able to correlate the labelling pattern with structures known to contain or not contain the antigen. Any treatment that blocks or removes the antigen should eliminate the labelling.
References
Dahl, R., and Staehelin, L. A. (1989). J. Electron Microsc. Tech. 13, 165-174.
Giberson, R. T., and Demaree, R. S., Jr. (1999). Methods Mol. Biol. 117, 145-158.
Griffith, J. M., and Posthuma, G. (2002). J. Histochem. Cytochem. 50, 57-62.
Griffiths, G. (1993). "Fine Structure Immunocytochemistry." Springer Verlag, Heidelberg.
McDonald, K. (1999). Methods Mol. Biol. 117, 77-97.
Ottersen, O. P., Zhang, N., and Walberg, F. (1992). Neuroscience 46, 519-534.
Robardo, A. W., and Sleytr, U. B. (1985). In "Practical Methods in EM" (A. M. Glauert, ed.), Vol. 10, pp. 309-324 Elsevier, Amsterdam.
Roos, N., and Morgan, A. J. (1990). "Microscopy Handbooks of Royal Society" Oxford Univ. Press, Oxford.
Slot, J. W., Geuze, H. J., Gegengack, S., Leinhard, G. E., and James, D. E. (1991). J. Cell Biol. 113, 123-136.
Studer, D., Michel, M., and Muller, M. (1989). Scan. Microsc. 3, 253-269.
Tokuyasu, K. T. (1973). J. Cell Biol. 57, 551-565.
Tokuyasu, K .T. (1978). J. Ultrastruct. Res. 63, 287-307.
van Genderen, I. L., van Meer, G., Slot, J. W., Geuze, H. J., and Voorhout, W. E (1991). J. Cell Biol. 115, 1009-1019. Webster P. (1999). Methods Mol Biol. 117, 49-76.
Support our developers


