Bacterial Resistance to Antimicrobial Agents: Mutation
In Experiment 15.3, you detected bacterial resistance resulting from an enzyme whose production was directed by a gene on a bacterial plasmid. In this experiment, you will detect resistance resulting from a mutation in a gene on the bacterial chromosome. Mutations occur at varying rates in the bacterial cell, usually between 1 in 104 to 1 in 1012 divisions. Bacteria are haploid; that is, they have only one unpaired chromosome in contrast to the multiple, paired (diploid) chromosomes seen in most higher organisms. Because of this haploid nature, recessive mutations do not occur as they do in diploid organisms and therefore, bacterial mutations are more easily detectable. In addition, bacteria multiply to large populations rapidly (usually 109 cells in an overnight broth culture) so that mutants could be expected to arise in a short time. Most bacterial mutations go unrecognized and the mutants may not survive unless the mutation provides a selective advantage for the cell, such as the ability to survive in the presence of an antimicrobial agent that is lethal for the wild-type (nonmutated) population.Streptomycin is an antimicrobial agent that, like gentamicin, inhibits protein synthesis by acting on the bacterial ribosome. E. coli organisms become resistant to streptomycin with just one mutation so that, as we shall see, this organismantimicrobial agent combination is convenient to use to illustrate the mechanism of chromosomal resistance.
| Purpose | To select E. coli mutants resistant to streptomycin |
| Materials | Tubes containing 19 ml of nutrient agar (first session) Tubes containing 20 ml of nutrient agar (second session) Flasks containing 49 ml of nutrient broth Sterile petri plates Streptomycin solution (20 mg/ml) 18- to 24-hour broth culture of Escherichia coli 1-ml pipettes Tubes contining 0.5 ml sterile water |
Procedures
- During this experiment, you will have to perform several steps quickly before the agar in the tubes solidifies. Examine figure 15.3 beforehand to be certain you know how you will proceed before removing the tubes from the water bath.
- Place 3 melted tubes of nutrient agar into a 50°C water bath.
- With your marking pen or pencil, label one tube of melted agar, one flask of broth, and one petri plate “SM 100” (that is, with 100 µg of streptomycin/ml). Label another tube of melted agar, one flask of broth, and one petri plate “SM 250” (with 250 µg of streptomycin/ml). Label the third tube of melted agar, one flask of broth, and one petri plate “No SM” (without streptomycin). The last tube and flask serve as your controls.
- Add 0.1 ml of the streptomycin solution to the melted tube labeled “SM 100” and 0.25 ml streptomycin to the tube labeled “SM 250.”
- Immediately add 1 ml of the overnight culture of E. coli to each agar tube containing streptomycin and the control tube without streptomycin. Mix well by rotating each tube between the palms of your hands (not by shaking) and quickly pour into the petri plates labeled to correspond to the tubes. Set the plates aside to harden.
- Add 0.25 ml of the streptomycin solution to the flask of broth labeled “SM 100” and 0.6 ml to the flask labeled “SM 250.”
- Add 1 ml of the E. coli culture to each flask with streptomycin and the control flask without streptomycin.
- Once the plates have hardened (step 5), seal around their edges with strips of Parafilm as demonstrated by the instructor. Incubate all plates and flasks at 35°C. At the next session, you will determine whether colonies resistant to streptomycin have arisen (steps 9 through 18).
- Label two tubes of melted nutrient agar “SM100,” label two tubes “SM 250,” and two tubes “No SM.” Place all tubes in a 50°C water bath.
- Label the bottoms of six petri dishes as follows (refer to the figure):“agar SM 100,”“agar SM 250,”“agar No SM,”“broth SM 100,”“broth SM 250,”“broth No SM.”Now divide each of the 6 plates into three sections with your marking pen or pencil. Label the sections of each plate as follows:“SM 100,”“SM 250,”“No SM.”
- To each of the two tubes of melted agar (step 9) labeled “SM 100,” add 0.1 ml of the streptomycin solution. Pour one into the petri plate labeled “agar SM 100” and one into the plate labeled “broth SM 100.”
- To each of the two tubes of melted agar labeled “SM 250,” add 0.25 ml of the streptomycin solution and pour into the appropriate plates labeled “SM 250” as in step 11.
- Pour the last two tubes of agar without streptomycin into the corresponding petri plates. Set plates aside to harden.
- Examine the broths and plates inoculated at the previous session.
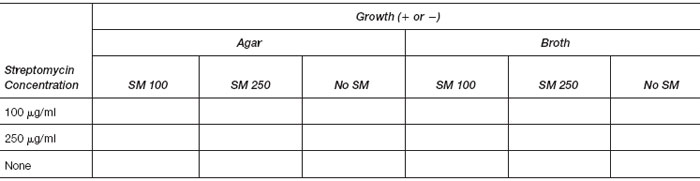
- Record your observations of growth or no growth in the chart.
*If the number of colonies is greater than 300, record as TNTC (too numerous to count).
- From each agar plate on which you see bacterial growth, suspend a few colonies in a tube of sterile water. Streak a loopful of the suspension onto the correct section of the 3 freshly prepared agar plates labeled “agar.” For example, colonies growing on the plate that contained 100 μg of streptomycin/ml, will be streaked onto the three sectors labeled “SM 100” on each plate.
- Streak a loopful from each of the three flasks onto the corresponding sectors of the plates labeled “broth.”
- Seal all plates with Parafilm and incubate at 35°C.
- Examine the plates at the next session and record your results in the chart.
State your interpretation of these results.
Do you have any colonies on your plates that arose in the presence of streptomycin but do not grow when subcultured to media without streptomycin? What would be the explanation for this phenomenon?
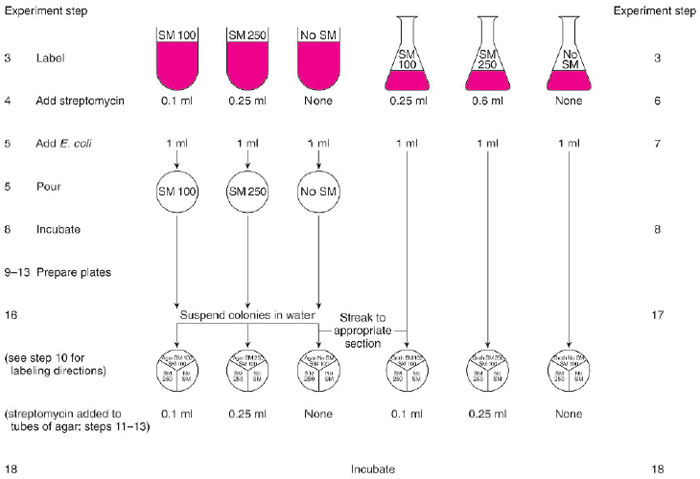 |
| Figure 15.3 Flow chart for performing Experiment 15.4. |
Support our developers


