Basic Cytogenetic Techniques: Culturing, Slide Making, and G Banding
During metaphase of the cell cycle, the condensed chromosomes align along the metaphase plate prior to chromatid separation and then move along the spindle fibres to the poles of the spindle. A spindle inhibitor, colchicine, can be added during metaphase, which disrupts the polymerisation of the spindle fibres, arresting the cell cycle at the stage when the chromosomes are fully condensed. It is possible to increase the number of metaphases by synchronising the cell cycle with a chemical blocking agent such as thymidine. The addition of excess thymidine results in the inhibition of DNA synthesis and the cells collecting in S phase. When the thymidine block is removed by washing the cells in fresh medium or by the addition of deoxycytidine, the synchronised cells progress to M phase and, by careful timing of the addition of colchicine and subsequent harvest, a large number of longer chromosomes in early metaphase can be collected.
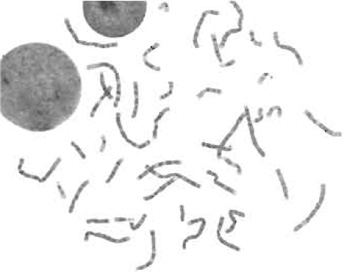 |
| FIGURE 1 A metaphase from a synchronized blood culture. Courtesy of Lyndsey Connell, Oxford Cytogenetics Laboratory. |
In order to visualise the chromosomes, these cells are harvested with hypotonic and fixative stages. The hypotonic solution swells the cells, allowing the chromosomes to separate. The cells are fixed with glacial acetic acid/methanol, which removes water and hardens the cell membrane. The final fixed cell suspension is dropped onto a microscope slide where evaporation of the acetic acid/methanol fixative results in bursting of the cells and spreading of the metaphase chromosomes. Humidity plays a key role in the rate of evaporation of fixative and control of chromosome spreading, hence an optimal microenvironment is vital to the production of well-spread chromosomes
(Fig. 1).
Routine G banding with trypsin gives each chromosome a distinct banded pattern that allows identification of discrete regions along each chromosome and the opportunity to screen for chromosomal imbalance of at least 3-5Mb by standard microscopic analysis.
Diagnostic cytogenetic investigations are used routinely within the clinical setting to screen for chromosomal imbalance in a wide range of patients. These methods describe a synchronised suspension culture of blood and an unsynchronised adhesion culture of tissue.
RPMI with 20mM HEPES (52400-017), penicillin (10,000 U/ml)/streptomycin (10,000 µg/ml)/glutamine (29.2mg/ml) (10378-016), trypsin 2.5% (15090-046), phytohaemagglutinin (10576-015), Hanks BSS (14180- 046), and colcemid (15212-012) are from GIBCO. Hams F10 (N6013), thymidine (T9250), 2-deoxycytidine (D3897), colchicine (C9754), EDTA 0.02% (E8008), amphotericin B (A9528), and phosphate-buffered saline (PBS), pH 7.4 (P3813) are from Sigma. Heparin (101929) is from ICN. Ultroser G (15950-017) is from Biosepra. Fetal calf serum is from various sources, including Sigma, GIBCO, and Seralab. Methanol (101586B), glacial acetic acid (10001CU), KCl (101983K), Leishman's stain solution (350226N), buffer tablets, pH 6.8 (331992P), XAM mountant (361194V), and washed glass slides (406/0181/02) are from BDH. Difco trypsin (215320) is from Becton-Dickinson. Virkon (R330003/Q) is from Radleys. Tissue culture flasks (25cm2, Nunc 163371), blood culture tubes (Falcon 35-2027), 1-ml plastic pastettes (Alpha LW4010), sterile petri dishes (Sterilin 101R20), sterile scalpels (Swan Morton) and needed. Gas (5% CO2/95% air) is required if a CO2 incubator is not being used.
Equipment includes a class II laminar flow hood, incubator, centrifuge, inverted microscope, light microscope with phase 10 and 100x objectives, hot box oven, hot plate. Local humidity control can be helped by humidifiers, dehumidifiers, or controlled environment equipment.
III. PROCEDURES
A. Synchronised Cell Culture of Human T Lymphocytes
Blood should be collected into heparinised, ideally lithium heparin, tubes to prevent coagulation. Although whole blood is cultured, T lymphocytes are used routinely for blood cytogenetic investigations. As these cells are not spontaneously dividing, phytohaemagglutinin (PHA), a mitogen, must be added to transform the T lymphocytes and start cell division. PHA is only required during the first 24h of cell culture and so is omitted from postsynchronisation release medium. Blood is routinely cultured for 72h.
- Phytohaemagglutinin must be used within 2-3 weeks after rehydration.
- Phosphate-buffered saline pH 7.4: Add one sachet to 1 litre distilled water
- Working stock solutions: Heparin (1250 units/ml in distilled water), thymidine (10mg/ml in PBSA), 2-deoxycytidine (10µg/ml in distilled water), and colchicine (250µg/ml for blood in distilled water)
- Complete medium: 100ml RPMI, 20ml fetal calf serum, 1ml penicillin/streptomycin/glutamine, 0.2 ml heparin, and 2 ml phytohaemaglutinin
- Release medium: 100ml RPMI, 10ml fetal calf serum, 2ml penicillin/streptomycin/glutamine, and 2ml deoxycytidine
- KCl hypotonic: 0.056 M (4.2 g/litre)
- Fixative: 3:1 methanol:glacial acetic acid
Steps
Day 1 Establishing Cultures
- Dispense 5 ml of complete medium into a labelled sterile culture tube. Add 0.25ml of blood with a sterile plastic pastette. Replace lid and invert to mix.
- Place in a culture rack and incubate in a 37°C incubator. A culture rack with a slanted edge allows the tubes to lie at a 20-30° incline and increases the media/cell pellet surface area for improved exchange of gas and nutrients.
Day 4 Synchronisation Release and Harvest
- Centrifuge cultures at 1200rpm for 5min. Remove the supernatant from the culture tube, leaving approximately 1cm depth of supernatant. Add 4ml release medium and resuspend cells. Note time of release and reincubate.
- Four hours after synchronisation release, add 0.1 ml colchicine per tube, invert culture tubes to mix, and reincubate cultures.
- After 20min incubation, centrifuge at 1200rpm for 5 min. Remove supernatant, leaving approximately 0.5 ml in the tube. Resuspend cells and gently add 5 ml KCl hypotonic. Replace lid and invert the tube to ensure thorough mixing. Reincubate culture tubes for 5 min.
- Centrifuge at 1200 rpm for 5 min. Remove supernatant. Resuspend cells thoroughly. Very gently, add 5ml fixative (drop by drop at first and then more quickly) whilst continuously mixing the cell pellet either by flicking the tube or by mixing on a whirlimixer to prevent cell clumping. This stage is critical in producing clean preparations.
- Centrifuge culture tubes at 1200rpm for 5min. Pour off supernatant. Resuspend cells thoroughly and add 5ml fixative. Centrifuge culture tubes again, resuspend cells, and add 5 ml fixative. If the cell suspension looks faintly brown, repeat centrifuging and fixing once more before slide making. The cells are ready for slide making or may be stored at -20°C.
Tissue viability is improved if the tissue sample is transported in transport medium supplied by the laboratory.
Solutions
- Working stock solutions: Heparin (1250 units/ml), amphotericin B (0.25mg/ml), and colchicine (500µg/ml for tissues)
- Transport medium: 100ml Hams F10, 1ml penicillin/ streptomycin/glutamine, 0.2 ml heparin, and 1ml amphotericin B
- Complete medium: 100 ml Hams F10, 20 ml fetal calf serum, 1ml penicillin/streptomycin/glutamine, 1ml amphotericin B, and 2ml Ultroser 4. Trypsin/EDTA: 10ml of trypsin 2.5% added to 100ml EDTA 0.02%
- KCl hypotonic: 0.056 M (4.2 g/litre distilled water)
- Fixative: 3:1 methanol:glacial acetic acid
Steps
Day 1 Establishing Cultures
- Remove the tissue from the transport medium with a sterile pair of forceps and place in a sterile plastic petri dish. Using a sterile plastic pastette, add a few drops of medium to the tissue to prevent the sample from drying out. Mince the tissue finely with a sterile scalpel into ~0.5- to 1-mm3 pieces.
- Using a pastette, resuspend the minced tissue in a small volume (~0.25 ml) of medium and place on the growth surface of two labelled 25-cm2 flasks. Ensure that the tissue pieces are as evenly spread as possible. Gently invert the flask so that tissue adheres to the surface in a minimal amount of medium. Add 5 ml of complete tissue medium to each flask by running the medium down the lower side of the inverted flasks. Gas (5% carbon dioxide/95% air) the flasks if using a standard non-CO2 incubator, replace lids, and incubate at 37°C.
- After several hours (or overnight if cultures are set up late in the day), carefully turn the flasks the right way up so medium now covers the tissue.
- Cultures are examined for the first time when they are 6-8 days old. Replace the medium with 5ml of complete tissue medium. Gas (5% carbon dioxide/95% air) the flasks if using a standard non- CO2 incubator, replace lids, and incubate at 37°C.
- When sufficient cells have grown from the explants (covering one-half to two-thirds of the flask), the cells can be directly harvested or subcultured. Subcultured cells usually give a higher mitotic index.
Subculturing
- Prewarm trypsin/EDTA to 37°C. Remove culture medium and gently rinse flask with ~1ml of trypsin/EDTA. Add 0.5ml of prewarmed trypsin/ EDTA and reincubate for several minutes. Examine the flask under low magnification on an inverted microscope. The cells should appear either rounded up or floating in the medium. Tap the flask lightly two or three times to dislodge any remaining cells. Add 1ml of medium and divide the cell suspension between two new labelled flasks.
- Add 5ml of complete medium to each flask, including the original, which can be retained as a backup. Gas (5% carbon dioxide/95% air) the flasks if using a standard non-CO2 incubator, replace lids, and incubate at 37°C.
- Add 0.1ml colchicine to each flask and reincubate for 2h. Prewarm trypsin/EDTA to 37°C.
- After 2h, examine the cells under low magnification with an inverted microscope. A number of rounded, dividing cells should be present. Pour off the medium from the flask into a labelled centrifuge tube. Add 1ml of trypsin/EDTA and rinse the flask, adding this to the centrifuge tube. Add 0.5-1ml of trypsin/ EDTA to each flask and incubate for 2-5min. Tap the flask two or three times. Examine the flasks to check that cells are in suspension. Add 2 ml of culture medium to the flask and transfer all medium and cells to the centrifuge tube.
- Centrifuge the tube at 1200rpm for 7min. Pour off the supernatant from the tube. Resuspend the pellet by flicking the tube. Add 5 ml KCl hypotonic solution to the tube and invert gently to mix. Centrifuge at 1200rpm for 7 min. Pour off the hypotonic, resuspend the cell pellet, and gently and slowly add fixative whilst flicking the tube to prevent cell clumping. After approximately 0.5ml has been added, top up more quickly to 5 ml. The cells are ready for slide making or may be stored at -20°C.
Solution
- Fixative solution: 3:1 methanol: glacial acetic acid
Steps
- Centrifuge cell suspensions at 1200rpm for 5min. Pour off supernatant and resuspend the cell pellet by tapping the tube and add three drops of fixative.
- Using a plastic pipette, place a single drop of cell suspension in the middle of a labelled slide from a height of I cm. The slide can be held fiat, allowing the drop to spread as a circle or the slide can be held at 20-30° so that the drop runs down the length of the slide.
- Add a single drop of fixative from the same height in the same manner when the area of cells becomes visible as a cloudy area and Newton's rings appear on the periphery. Allow the fixative to evaporate.
- Check the cell density and metaphase spreading using a phase microscope.
- If the slide has sufficient metaphases of an appropriate length, continue with slide making. If the cell density is too high, add a few more drops of fixative and check by making another slide. If the cell density is too low, add 5 ml fixative, centrifuge the suspension again, and repeat but add less fixative. Cell spreading can be altered by changing cell density, local humidity, or the rate of drying. Underspreading can be improved by breathing on the slide before adding the cell suspension, adding two drops of fixative to the cells on the slide, or placing the slide on a wet paper towel. Overspreading can be reduced by omitting the second drop of fixative, using cold fixative cooled in a freezer before use, or increasing local air flow and speed of drying.
- Add 5 ml fixative to any remaining cell suspension and store at -20°C.
- Age slides either overnight by putting in metal racks in a hot box oven at 70°C or for 1h on a hot plate at 80°C or on the bench for several days.
Solutions
- Hanks pretreatment solution: 8ml of Hanks BSS (10x) plus 40ml of distilled water
- Phosphate-buffered saline pH 7.4: Add one sachet of powder to 1 litre of distilled water
- Banding trypsin solution: Rehydrate bottle of Difco trypsin with 10ml of distilled autotoclaved water. Add 1ml of trypsin solution to 40ml PBSA.
- pH 6.8 buffer solution: Add 1 tablet to 1 litre of distilled water
- Leishman's staining solution: 40ml, pH 6.8, buffer solution plus 8 ml Leishmans' stain
Steps
- Place a test slide in the Hanks pretreatment solution for 3 min. Rinse the test slide in tap water for 5 s. Place the slide in the trypsin solution for 33s (move slide gently in the solution). Whilst slide is in the trypsin solution, remove surface film from the stain by skimming with a piece of filter paper. Rinse slide in tap water. Place the slide in Leishman's staining solution for 2min. Rinse slide in tap water. Blot carefully with filter paper and leave to dry or dry on a hot plate for a short time.
- When dry, place three drops of XAM or similar mountant onto the slide along its length. Place a 22 x 50-mm coverslip onto the slide and blot gently to remove excess mountant.
- Assess banding using the light microscope at 1000x magnification and adjust times for Hanks, trypsin, and stain as appropriate. If the chromosomes appear generally grey with indistinct banding, increase the Hanks pretreatment time. If the chromosomes are bloated and the chromatids appear to be separating, reduce trypsin time. If they appear generally dark with little banding, increase the trypsin time. Staining should be modified so there is a clear distinction between pale staining and dark staining regions of the chromosomes.
- All culture work should be performed under the appropriate containment level (e.g., class 2 laminar flow cabinet).
- All waste material from cell cultures should be decontaminated prior to disposal. Waste media and hypotonic can be decontaminated in 2% Virkon for a minimum o f 10 min.
- Fetal calf serum is variable in supporting good cell growth and should be batch tested prior to bulk purchase and use. It is advisable to combine smaller aliquots from two different batches or suppliers rather than a single volume from one supplier in preparing complete medium.
- All complete culture media should be stored at 4°C and ideally used within 1 week of preparation.
- Our laboratory routinely uses colchicine. Many laboratories use the less toxic colcemid, adding 0.1 ml of stock solution to 5 ml culture.
- The methanol/glacial acetic acid fixative should be freshly made before harvesting and slide making.
- Slides should be grease free to ensure optimal chromosome spreading. Precleaned slides may be purchased.
V. PITFALLS
If the first fixation stage of a blood culture results in a gelatinous cell suspension, add an equal volume of distilled water, mix, recentrifuge, and continue with protocol.
Support our developers


