Fluorescent Visualization of Genomic Structure and DNA Replication at the Single Molecule Level
DNA fibre fluorescent in situ hybridization (FFSH) techniques provide kilobase resolution for physical mapping, genomic structure, and/or DNA replication analysis at the single molecule level (Caburet et al., 2002; Herrick and Bensimon, 1999). Objectives of DNA fibre preparation are similar for most techniques: (1) a high degree of stretching to obtain optimal resolution, (2) long fibres for long range studies, and (3) sufficient numbers of molecules to enable a population overview. DNA preparation by molecular combing constitutes an important advance in this area (Bensimon et al., 1994). Molecules are stretched uniformly by a constant stretching force regardless of sequence content whereby 1 µm of stretched DNA represents 2kb. Uniform stretching is important because the arduous task of calibrating each slide or areas within a slide with external controls is not required. Because the stretching force is one order of magnitude less than that needed to break the double helix, molecules that range between hundreds of base pairs to over one megabase are combed. The stretched DNA and molecule length provide a maximal resolution of 1-4kb over megabase distances. In addition, DNA binding to slides used for molecular combing is very efficient. Tens of thousands of DNA molecules corresponding to between 30 and 100 mammalian genomes are combed per surface. Therefore, population data are obtainable without compromising the sensitivity of single molecule analysis. This article provides all the necessary protocols to set up molecular combing and to carry out physical mapping, genomic structure, and DNA replication studies using combed DNA as a substrate (Anglana et al., 2003; Gad et al., 2002; Herrick et al., 2000; Maho et al., 1999; Monier et al., 1998; Pasero et al., 2002).
7-Octenyltrichlorosilane (539279), hydrogen peroxide solution 35wt. % in water (H2O2) (349887), ammonium hydroxide solution (NH4OH) (A6899), chloroform (C-5312), 5-bromo-2'-deoxyuridine (BrdU) BrdU (B-9285), 5-chloro-2'-deoxyuridine (CldU) (C- 6891), 5-iodo-2'-deoxyuridine (IdU) (I-7125), EDTA (E- 9884), sodium dodecyl sulfate (SDS) 10% solution (L-4522), 2-morpholinoethanesulfonic acid (MES) (M- 2933), ethanol (EtOH) (E-7023), sodium hydroxide (NaOH) (S-8045), sodium acetate (NaAc) (71183), glacial acetic acid (45726), Hybri slips (Z36,590-4), trizma hydrochloride (Tris) (T-5941), sodium chloride solution (NaCl) 5M (S-5150), Tween 20 (P-9416), and N-lauroylsarcosine sodium salt (L-9150) are from Sigma-Aldrich. The 22 × 22-mm cover glass (coverslip) (2865-22) is from Corning. Miscroscope slides (4951) are from Erie Scientific Company. Plug molds (1703706) are from Bio-Rad. Low melting temperature (LMT) Nusieve agarose (50081) is from Cambrex. Proteinase K (1.24568) is from Merck Biosciences. β agarase I and buffer (M0392S) are from New England Biolabs. Phosphate-buffered saline (PBS) 10x (PBS10X03), TE 1× (TE1X5000), deionized formamide (FORMD003), dextran sulfate, sodium salt 50% (w/v) solution (DEXT5100), and SSC 20x (SSC20X02) are from Qbiogene. BioPrime DNA labelling kit (18094011) and human Cot-1 DNA (15279011) are from Invitrogen/ Gibco-BRL. DIG High Prime (1585606), blocking reagent (1096176), FITC-conjugated sheep antidigoxigenin Fab fragments (1207741), antidigoxigenin-AP Fab fragments (1093274), antibiotin-AP Fab fragments (1426303), and dig-labelled control DNA (1585738) are from Roche. Herring sperm DNA (D1815) is from Promega. HybChamber mica (HYB-04) is from Genemachines. YOYO-1 iodide (Y3601), streptavidin, Alexa 350 conjugate (S11249), streptavidin, Alexa 488 conjugate (S32354), streptavidin, Alexa 594 conjugate (S32356), streptavidin, Alexa 750 conjugate (S21384), Alexa 350 goat antimouse IgG (A21049), Alexa 350 donkey antigoat IgG (A21081), Alexa 594 donkey antirat (A21209), Alexa 488 goat antimouse (Al1029), Alexa 488 donkey antisheep (Al1015), and SlowFade light antifade kit (S7461) are from Molecular Probes. Biotin-conjugated rabbit antistreptavidin (200-4695) and FITC-conjugated rabbit antidonkey (616-4202) are from Rockland. Mouse anti-BrdU (347580) and FITCconjugated mouse anti-BrdU (347583) are from BD Biosciences. Rat anti-BrdU (ab6326) is from Novus Biologicals. Texas red-conjugated donkey antirat (712-075- 153) is from Jackson. HybondN+ (82mm), 50 discs (RPN82B) is from Amersham.
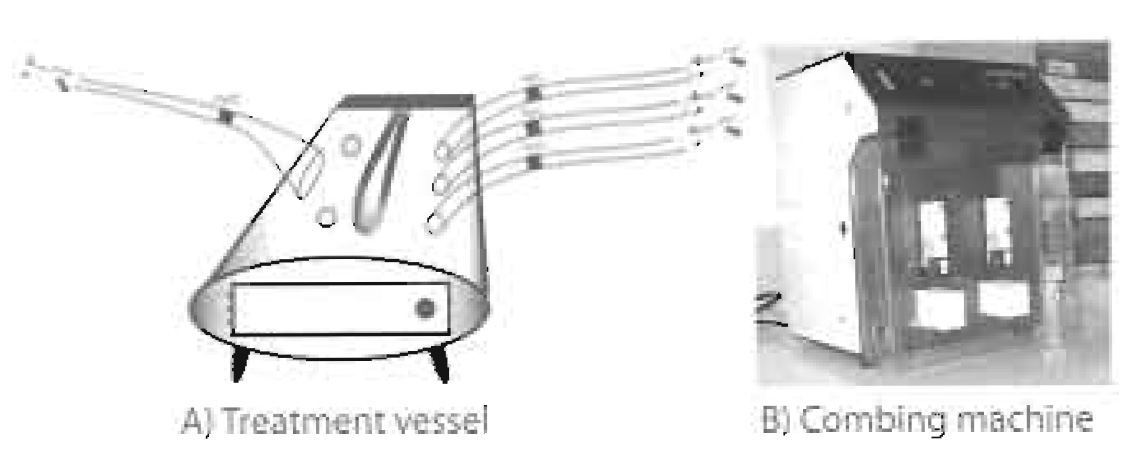 |
| FIGURE 1 (A) The schematic of a glass treatment vessel shows all the required components: housing for a quartz- covered UV lamp, three tube entrances for pressurised gas flow, one tube exit, appropriate tubing and valves, entry ports along the roof of the vessel to inject silane via a syringe, and a door to introduce and remove racks of glass coverslips. (B) This combing machine, which can comb two coverslips at a time from two different reservoirs, is currently used at Institut Pasteur. |
The following can be purchased from a local laboratory equipment specialist: argon gas tank, oxygen gas tank, gas hydration device, UV lamp covered with quartz, 1000-µl glass syringe (Hamilton), water baths, rotating wheel, tissue culture incubator, hood for tissue culture, facilities for performing gel electrophoresis, plastic polypropylene jars for slides, tweezers, Kim Wipes, parafilm. Nail polish and Superglue can be bought from a local supermarket.
Teflon reservoirs with a 25 × 25 × 2-mm interior (approximately 1.3ml volume), ceramic coverslip racks for 12 coverslips each, tubing with appropriate valves, and a treatment vessel for glass silanisation were all custom made at Institut Pasteur.
The combing machine, shown in Fig. 1, must have the following characteristics.
- Coverslip holders that grip the silanised surface by an edge.
- The capability to quickly descend the coverslip holders so that the coverslip is inserted into a combing reservoir.
- The capability to lift the coverslip holders so that the coverslip is removed from the reservoir at a constant speed of 300 µm/s.
III. PROCEDURES
A. Coverslip Silanisation for Molecular Combing
Solution
Pirana solution: Add 390ml of NH4OH and 360ml of H2O2 immediately prior to each round of slide preparation.
Steps
- Work in a fume hood.
- Distribute seventy-two 22 × 22-mm coverslips into six ceramic racks.
- To clean the surface, place racks with coverslips into the pirana solution and leave for 2h.
- Briefly rinse the coverslips three times with sterile ddH2O.
- Dry coverslips and racks with a stream of oxygen.
- Place the racks in the treatment vessel.
- Place one small aluminium pocket (holds less than 1ml) next to each pair of ceramic racks.
- Close the vessel, rendering it airtight.
- Open the exit valve.
- Fill the vessel with oxygen by (1) administering a flow of oxygen at a rate of 15 litre/min for 1 min, (2) applying an 8 litre/min flow for 5 min, and (3) reducing the flow to 0.160 litre/min. Keep this flow constant for the duration of the following step.
- Cover the vessel with aluminium and turn on UV lamp for 1h. UV converts oxygen to ozone, which helps cleanse the glass further.
- Remove ozone by flushing vessel with a 2 litre/min flow of inert argon.
- Apply an argon flow that is hydrated by 10% at a rate of 1 litre/min for 20min.
- Close all entry and exit valves. Allow hydration to continue for 10min in the closed vessel.
- Open the exit valve. Remove excess water vapour with a 0.9 litre/min flow of argon.
- Using a syringe, inject 150µl of 7-octenyl-trichlorosilane into the vessel through the small ports by dispensing 50µl into each aluminium pocket.
- When finished, rinse the syringe three times with chloroform and then three times in 100% ethanol.
- Shut off the argon flow and allow the pressure in the vessel to return to zero.
- Close all valves. The silane will begin to vaporise naturally. Let this process occur overnight. This gas silanises the glass coverslips.
- The following day, open the exit valve and rinse the vessel with an 8 litre/min argon flow for 5 min.
- Open the vessel, remove the racks, and allow the slides to dry for 1h at room temperature.
- Store coverslips with aluminium wrapping in a dust-free environment.
B. Preparing High Molecular Weight DNA in Agarose Blocks
Solutions
- NaOH 30% (w/v): Dissolve 15 g of NaOH in 40 ml of ddH2O. Bring the total volume to 50ml.
- 0.5M EDTA, pH 8: To make 1 litre, dissolve 186.12 g of EDTA in 900ml of ddH2O. Adjust the pH to 8 by adding NaOH 30% (w/v). Add ddH2O for a final volume of 1 litre.
- 1× PBS: Add 900ml of ddH2O to 100ml of 10x PBS to make 1 litre.
- 1% LMT agarose: Prepare 50 ml by adding 0.5 g to 50ml of 1× PBS. Heat and mix to dissolve the agarose. Store at 4°C.
- 10mg/ml proteinase K stock: Dissolve 500mg of proteinase K in 50ml of 0.5M EDTA, pH 8. Make 1-ml aliquots and store at -20°C.
- Proteinase K digestion (PKD) solution: 2 mg/ml proteinase K, 1% SDS, and 100mM EDTA. On the day of cell harvesting for DNA extraction, prepare 5ml of PKD by adding a thawed 1-ml aliquot of proteinase K stock and 0.5 ml of 10% SDS to 3.5 ml of ddH2O. Vortex. This is sufficient for 20 agarose blocks. Adjust the amount accordingly.
Steps
- Prechill 50ml of sterile 1× PBS in an ice bucket.
- Turn on a 37°C water bath in the laboratory.
- Melt LMT agarose in microwave and leave molten in 50°C water bath.
- Preheat PKD solution at 50°C.
- Cover bottom of plug molds with tape.
- In tissue culture, harvest cells and collect pellet according to cell type and laboratory protocols.
- Take off supernatant.
- Resuspend cells in ice cold 1× PBS so that there are 250,000 cells/50µl, i.e., for 2 million cells, resuspend in 400µl of 1× PBS. Leave on ice until all samples have been resuspended in appropriate volumes.
- Put cell suspension in 37°C water bath for 5 min.
- Add an equal volume of 50°C molten LMT agarose and mix gently but thoroughly with a pipette.
- Fill plug molds with cell/agarose mix (approximately 90 µl per plug).
- Put the mold at 4°C for 20min to allow blocks to solidify.
- Eject plugs and add adequate amounts of the preheated PKD solution so that there is a minimum of 250 µl per block.
- Leave overnight at 50°C to allow for deproteination of DNA.
- The following day, remove the proteinase K digestion solution and replace it with 10ml of 500mM EDTA, pH 8.0. Blocks can be stored indefinitely at 4°C.
C. Labeling DNA for Replication Studies
Solutions
- 1× PBS: see Section III,B.
- 10mM CldU stock: Dissolve 262.7mg of CldU in 100ml of 1× PBS. Make 2-ml aliquots and store indefinitely at -20°C.
- 10mM IdU stock: Dissolve 354.1mg of IdU in 100ml of 1× PBS and store indefinitely at 4°C.
- Media with 100 µM CldU/IdU (for adherent cell cultures): On the day of the experiment, prepare tissue culture tubes with a volume of media that corresponds to the size of the tissue culture flask. Add appropriate volume of CldU stock to make a 100µM final concentration, i.e., for a T75 flask, add 150µl of CldU stock to 15 ml of media. Repeat with IdU. After addition, mix the media well and keep at 37°C in close proximity to the tissue culture hood.
1. Adherent Cell Cultures
Steps
- Carry out steps 1-5 in Section III/B prior to the following.
- Preheat a nucleotide-free media bottle in the same 37°C waterbath as media/CldU and media/IdU mixes.
- Aspirate off media from the cell culture.
- Add media/IdU mix and restore flask to 37°C incubator. Start a timer.
- At t = 30min, aspirate media/IdU and wash cells three times with warm nucleotide-free media as quickly as possible.
- Add media/CldU mix and put the flask back in the 37°C incubator.
- At t = 60 min, aspirate media/CldU mix.
- Go step 6 in Section III,B and complete that protocol.
Suspension Cell Cultures
Steps
- Carry out steps 1-5 in Section III/B prior to the following.
- In a 37°C water bath with easy access to a tissue culture hood, warm a sufficient quantity of IdU and CldU to produce a 100 µM final concentration of the cell culture volume, i.e., for a T75 containing 15 ml of cell suspension, warm 150µl of IdU and CldU each.
- To an exponentially dividing cell culture add warm IdU stock so that final concentration is 100 µM.
- Mix gently with a pipette and restore to 37°C incubator. Start the timer.
- At t = 30min, add warm CldU stock so that final concentration is 100 µM.
- Mix gently with a pipette and put back in 37°C incubator.
- At t = 60 min, go step 6 in Section III, B and complete that protocol.
Solutions
- NaOH 30% (w/v): see Section III,B.
- Combing buffer, 0.5M MES, pH 5.5: For 250ml, dissolve 24.4g of MES in 225ml of sterile ddH2O. Adjust the pH to 5.5 using NaOH 30% (w/v). Bring the final volume to 250 ml with sterile ddH2O. Autoclave and store at room temperature.
- YOYO-1/TE mix: On the day of the experiment, for each block to be prepared dilute 1µl of YOYO-1 stock in 200 µl of TE. Scale according to how many agarose blocks are to be used. Keep in the dark at room temperature.
- 10x β agarase buffer: Included with β agarase enzyme
Steps
- Remove one agarose block containing DNA from EDTA storage buffer and put in a 50-ml sterile tube (for DNA replication studies, see Section IV, E).
- To remove residual proteinase K and SDS, wash five times in 50ml TE on a rotating wheel.
- Transfer agarose block to a sterile round-bottom 2- ml Eppendorf tube.
- To stain DNA, add the YOYO-1/TE mix (200µl) and leave sit at room temperature for 1h in the dark.
- Transfer block to sterile 15ml and remove excess YOYO-1 by washing twice in 10ml of TE on a rotating wheel protected from light.
- Put the block in a new round-bottom 2-ml Eppendorf tube and add 200µl of TE.
- Heat the block at 69°C for 20min to melt the LMT agarose.
- Reduce temperature by putting the Eppendorf tube in a 42°C water bath for 10min.
- Warm the 10× β agarase buffer to 42°C during this period.
- Add 30µl of 10× β agarase buffer to the molten agarose/DNA mix, put back at 42°C and wait for 5 min to allow the buffer to diffuse.
- To digest agarose, add 1.5 µl of β agarase and incubate overnight at 42°C.
- The following day, slowly add 900µl of MES combing buffer to the DNA solution.
- Put back in the 42°C water bath and allow the solution to mix for one 1 h.
- Gently pour the DNA solution in a Teflon combing reservoir.
- Add MES buffer so that the DNA solution nearly fills the reservoir.
- Store DNA solution at room temperature in the dark for up to 1 month.
- Once the DNA solution is in the reservoir, prevent evaporation when not combing by covering with Parafilm.
- When finished with a DNA solution, empty and clean combing reservoir by boiling for 45 min in ddH2O.
Steps
- Place a silanised surface in the coverslip holder attached to the combing machine.
- Let the machine lower the coverslip into the combing reservoir that contains the DNA to be combed.
- Wait 5 min to allow DNA free ends to bind to the surface.
- Release the ascent function of the combing machine to remove the coverslip. During removal, the meniscus moving along the hydrophobic surface is combing the DNA.
- With an inverted microscope, visualise the YOYO- 1 stained DNA as a combing quality check.
- Bake the combed DNA at 65°C overnight with the surface untouched by the inverted microscope facing up.
- Use Superglue to stick the coverslip to a slide and store at -20°C (see Fig. 2).
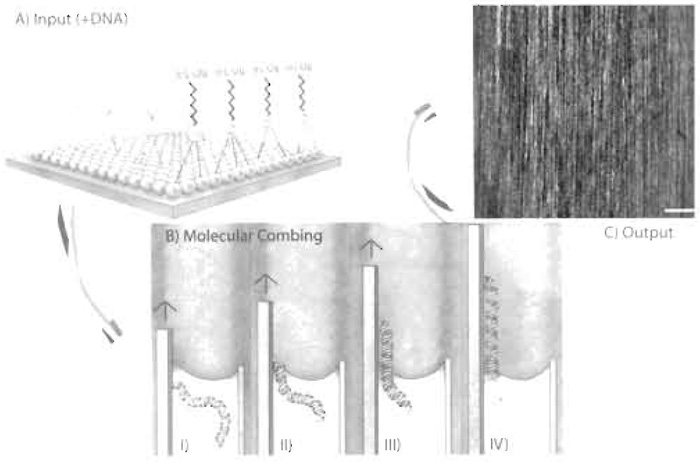 |
| FIGURE 2 At the core of molecular combing is the silanised coverslip (A). An organic monolayer is covalently attached to inorganic glass via Si groups. At the terminal end of the carbon chains reside vinyl groups. It is a combination of the hydrophobic nature of the silanised glass and the terminal vinyl groups, which allow all the following processes of molecular combing to occur (B). DNA in solution attach to the coverslip by a free-end only (I). As the coverslip is removed from the reservoir, a meniscus is formed due to the interaction between the hydrophobic surface and the liquid DNA solution (II). This meniscus provides a constant force along the length of the DNA that yields evenly stretched molecules irrespective of sequence content (III). When the DNA is completely removed from the reservoir, it is immobilised in its stretched form (IV). The end product is a surface that is coated by stretched single DNA molecules (C). Bar: 20 µm. |
F. Labeling Probes with Biotin and/or Digoxigenin
1. Probe Labeling with Biotin-16-dUTP
Steps
- All components are included in the BioPrime DNA labelling kit. Thaw components and keep on ice.
- Add sterile ddH2O to 500ng of template DNA to a final volume of 24 µl.
- Add 20µl of 2.5x random primers and boil for 10min to denature DNA.
- Quickly place tubes on ice for 10min.
- Vortex and spin briefly.
- Add 5µl of 10x dNTPs (includes biotin-16-dUTP) and 1 µl of Klenow enzyme. Mix thoroughly with a pipette and spin to collect the reaction mix.
- Incubate at 37°C overnight. Once completed, store at -20°C.
2. Probe Labeling with Digoxigenin-ll-dUTP
Steps
- The Dig High Prime kit contains all the necessary components. Thaw components and keep on ice.
- Add lµg of template DNA and sterile ddH2O to a final volume of 16 µl.
- Denature DNA by boiling for 10min.
- Chill on ice for a further 10min.
- Add 4µl of Dig High Prime solution that contains random primers, dNTPs including digoxigenin-11- dUTP, and Klenow enzyme. Mix well with a pipette and spin quickly to collect the reaction mix.
- Incubate at 37°C overnight. Once completed, store at -20°C.
G. Slide Preparation for Hybridization and/or Fluorescent Detection of DNA Replication
Solutions
- 1× PBS: See Section III,B. Keep at 4°C
- 1 M NaOH: For 50 ml, dissolve 2 g of NaOH in 50 ml of sterile ddH2O. Keep at room temperature and replace every 2 weeks.
- 70, 90, and 100% ethanol (EtOH) dilution series: Keep at -20°C
Steps
- Remove slides to be used from -20°C and leave at room temperature for 1h.
- Place slides in 1M NaOH for 30min to denature combed DNA.
- Rinse three times in 1× PBS from 4°C fridge and once for 3 min to neutralise the NaOH.
- To help fix DNA, put slides through 70, 90, and 100% EtOH series for 5 min at each dilution.
- Remove excess EtOH with a Kim Wipe and air dry at room temperature. Use slides immediately once dried (go to Section III,H step 11 or, if only detecting replication, proceed directly to fluorescent detection protocols and use Table No. 5 in Table I).
 |
H. Hybridization and Posthybridization Washes
Solutions
- 3 M NaAc, pH 5.2: For 1 litre, add 246.1 g of NaAc to 800ml of sterile ddH2O and adjust pH to 5.2 using glacial acetic acid. Bring volume to 1 litre, autoclave, and store at room temperature.
- 100% ethanol at -20°C.
- Hybridisation buffer: 50% formamide, 10% w/v dextran sulfate, 2XSSC, and 0.1% SDS. To make 1ml, add 500µl of formamide, 200µl of 50% dextran sulfate solution, 100µl of 20x SSC, and 10µl of 10% SDS solution to 190µl sterile ddH2O. Store at -20°C for up to one month.
- 50% formamide/2× SSC: For 1 litre, dilute 100ml of 20x SSC in 400ml sterile ddH2O. To this add 500ml of formamide. Solution can be stored in dark at 4°C for 1 month.
- 2x SSC: For 1 litre, add 100ml of 20x SSC to 900ml of sterile ddH2O
- Chill to 4°C a centrifuge for 1.5-ml Eppendorfs that can reach a speed of 15,000rpm.
- In a 1.5-ml Eppendorf add lµg of each probe, 5x the total probe amount of human 1× cot DNA, and 1 µl of herring sperm stock. Bring to a final volume of 50µl with sterile ddH2O. Vortex and centrifuge briefly.
- To precipitate DNA, add 5 µl of 3 M NaAc, pH 5.2, and 150µl of-20°C EtOH. Vortex and spin.
- Put at -80°C for 30min to complete precipitation.
- Spin at 15,000 rpm in the 4°C chilled centrifuge for 30 min to pellet the DNA.
- Remove the supernatant, not touching the white pellet, and air dry.
- Once the pellet starts to turn translucent, add 25 µl of hybridisation buffer.
- Vortex for 20s to thoroughly mix. Spin briefly.
- Place Eppendorf in boiling water for 5 min to denature DNA.
- Immediately place in ice water for 10min. Probes are ready for hybridisation.
- Take slide from Section III,G step 5. Place probe/ hybridisation mix on surface and cover with a Hybri-slip (light-weight plastic coverslip).
- Place the slide in the HybChamber and add 50µl of 2x SSC to the reservoir to prevent evaporation of the probe during incubation.
- Close the HybChamber and incubate overnight at 42°C.
- The following day remove 50% formamide/2x SSC from 4°C and leave at room temperature for 1h.
- Remove the slide from the HybChamber and carefully displace the Hybri-slip with tweezers.
- In a fume hood, wash three times in 50% formamide/ 2x SSC 5 min each.
- Wash three times in 2x SSC for 3min each. Slides are ready for detection with fluorescent antibodies.
Solutions
- 1× PBS: See Section III,B and make 1 litre
- 1× PBS 0.05% Tween 20: For 1 litre, add 500µl of Tween 20 to 1 litre of 1× PBS. Store at room temperature indefinitely.
- Detection buffer: Blocking reagent 1% (w/v) in 1× PBS 0.05% Tween 20. For 100ml, dissolve 1 g of blocking reagent in 100 ml 1× PBS 0.05% Tween 20 by heating and mixing alternatively. Autoclave and store 1-ml aliquots at -20°C.
- Antibody stocks: All antibodies are prepared and stored according to the manufacturer's instructions. When received in powder format and where instructions are not indicated, dissolve antibodies in 1× PBS to give a concentration of 2mg/ml. Store these diluted antibodies at -20°C in single-use aliquots.
Steps
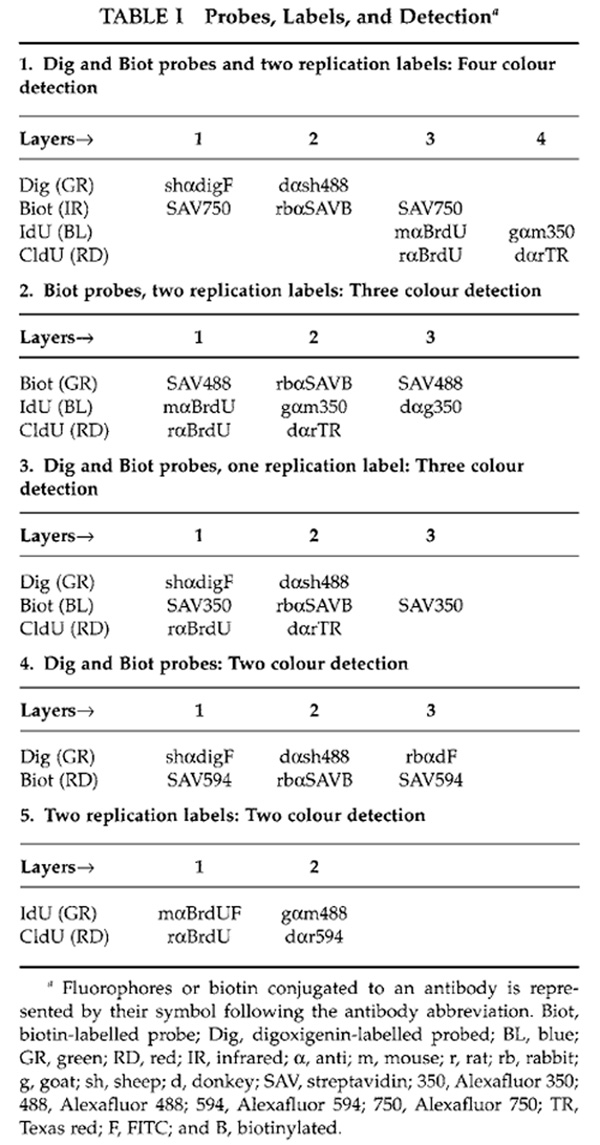
The following steps are repeated for each layer (except for step 9 which ends the detection). Refer to Table 1 for antibodies used to detect replication and/or probes.
- Immediately prior to use, thaw antibody aliquots, mix with a pipette, and spin briefly.
- Dilute 1 µl of each antibody used for a layer in 25 µl of detection buffer. The only exception to this rule is mouse anti-BrdU (FITC), which is diluted 5:25.
- Mix antibody mix with a pipette and spin briefly.
- Place the antibody mix on the surface and cover with a glass coverslip.
- Put in a humid chamber and leave at 37°C for 30 min. The only exception is the primary antibody layer to detect CldU and/or IdU, which is carried out at 37°C for 1h.
- Gently remove the coverslip by giving the slide a shake.
- Wash slides three times in 1× PBS 5 min each.
- Proceed to the next layer.
- When finished washing the final layer, mount slides in Slowfade Light antifade mounting media and seal with nail polish (Fig. 3).
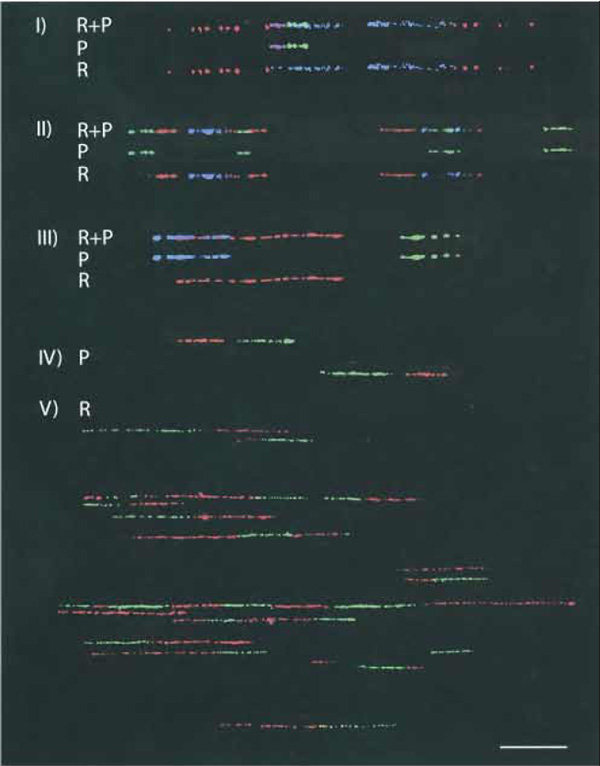 |
| FIGURE 3 Results from all detection schemes. The first molecule in the triad found in I, II, and III are probes (P) and replication (R) together. This molecule has been decomposed digitally to provide probe and replication signals only (we have done this because looking at P + R together can be confusing). In IV, two probe sets on different molecules with different orientation are provided as they were found on the same field of view. A typical field of view with the 40× objective of DNA replication using the paradigm outlined in this article is shown (V). See Table I for details on what colours represent. Bar: 25 µm. |
A. Coverslip Silanisation for Molecular Combing
- DNA binding, a constant stretching force, the immobilisation of DNA, and its availability for further manipulation are all critically dependent on optimal glass silanisation. If the various cleaning steps (pirana, ozone) are not carried out properly, irregularities on the glass may cause poor silanisation. Furthermore, before putting the coverslips in the reaction vessel, slides must be completely dry, as wetness may also cause heterogeneous silanisation. When opening the ports for the syringe containing the silane, care must be taken to be as quick as possible, as contamination of the vessel by the surrounding air can affect the silanisation process.
- The materials used for coverslip preparation have been chosen because they are easy to clean and are chemically inert.
B. Preparing High Molecular Weight DNA in Agarose Blocks
- The protocol given is for mammalian tissue culture cells only (for yeast, see Lengronne et al., 2001).
- In step 9, putting the cell suspension at 37°C for 5 min is required to raise the temperature sufficiently so that upon addition of molten agarose the agarose will not solidify before dispensing into blocks.
- Yeast DNA can be labelled by using a specific strain and some modified protocols (Lengronne et al., 2001).
- DNA replication protocols provided are for double labelling DNA from an asynchronous population of cells. Data obtainable from this type of labelling paradigm are origin position (when a region is localised using fluorescent hybridisation), interorigin distance, timing of firing of neighbouring origins, fork speed, and obstacles to fork progression (Anglana et al., 2003). Time of labelling and synchronisation can be personalised according to needs.
- It can be difficult to dissolve IdU and CldU in 1× PBS. The manufacturer recommends a basic solvent; however, addition of 1× PBS to cell culture when labelling cells is much less harsh to cells. Vortex and heat to 37°C to fully dissolve the nucleotides in 1× PBS.
- When preparing for an experiment, only heat the correct amount of IdU and CldU to avoid degradation of the stock.
- When mixing IdU and CldU with a suspension cell culture, mix well to evenly disperse the nucleotide. Do not mix with too much vigour so as not to break the cell-cell attachments with which many suspension cultures form and need to grow. In this way cells are not shocked during labelling and will proceed normally through S phase, providing robust DNA replication results.
- It is important to be efficient when carrying out all steps after t = 0, as tardiness can affect the time of nucleotide incorporation and, therefore, how interpretable results are.
- Optimal DNA binding to the slides is achieved at pH 5.5 (Allemand et al., 1997). Precision in combing buffer preparation is needed.
- If sediment forms during MES preparation, filter the buffer using a sterile syringe and a 0.2-µm filter. Store the MES combing solution at room temperature.
- When preparing DNA with replication labels, protect from light whenever possible, i.e., wrap the tube in aluminium when washing out proteinase K and SDS. Labeled DNA is sensitive to light and omission of light protection can lead to shorter molecules.
- Once the agarose has been melted, DNA is no longer protected from physical agitation. To attain the highest molecular weight DNA possible, avoid knocking the tube, handling it violently, or adding any solutions by a pipette quickly.
- When adding the β agarase buffer or the β agarase itself, do not vortex or mix with a pipette as this will greatly shear the DNA. Allow the buffer and enzyme to naturally diffuse throughout the molten agarose/DNA mix.
- It is critical that MES buffer is added as slowly as possible, as the currents generated are known to break DNA.
- Teflon reservoirs are used because they do not absorb DNA and are easy to clean.
- The combing machine needs to remove the coverslip at a constant rate of 300µm/s. This speed generates the constant perpendicular force of the meniscus that aligns and stretches the DNA. Because it is not greater than the force needed to break the double helix, the combing process in itself is not responsible for short DNA molecules. Nonsterile materials at any step during DNA preparation and excessive physical agitation are the principal causes for DNA shearing. Avoid both whenever possible to attain the longest possible length of combed DNA.
- When visualising the combed DNA under a microscope, an inverted microscope is preferred, as only one side is dirtied. The other side is preserved for use in hybridisation and fluorescent detection.
- The density of combed DNA is a function of the concentration of the DNA solution. The 250,000 genomes that are used per combing solution yield approximately 100 genomes per 22 × 22-mm surface. This is an optimal combing density for physical mapping and genomic structure studies, as a maximum number of probes can be scored with one slide. For DNA replication studies, however, a lower combing density is required to minimise the occurrence of overlapping replication signals that can confuse results. This is achieved by starting with only one-third to one-half of an agarose block when preparing DNA. The approximately 100,000 genomes provide an optimal combing density for DNA replication studies corresponding to about 30 genomes per 22 x 22-mm surface.
- Combing density can be increased slightly by repeatedly combing on the same slide and decreased by reducing the incubation time prior to removing the coverslip. However, more or less agarose blocks can equally be reprepared to suit the researcher's needs.
F. Labeling Probes with Biotin and/or Digoxigenin
- Because maximal resolution on combed DNA is 1-4kb, it is not recommended to use probes smaller than 4kb. Aside from this, there are essentially no limits as to what is selected as a probe, i.e., PCR product, cosmid, BAC, and/or YAC.
- Holes may appear in the hybridisation signal when repeats are covered with competitor Cot DNA (included in the hybridisation mix). A 20% repeat content for the probe is acceptable and attempts should be made to not exceed this value.
- To estimate probe concentration and to quickly determine whether random primed labelling worked, run an electrophoretic gel. Compare band intensity to control DNA ladders to estimate the concentration of DNA products. Reaction products should appear between a few hundred to a couple thousand base pairs. If bands appear near the size of the DNA template, the random primed labelling did not work.
- Poor hybridisation signals can be due to a low amount of biotin and digoxigenin hapten incorporation during random primed labelling. To check for probe labelling, on a Hybond N+ membrane, spot 1 µl of a probe dilution series next to a similar dilution series of control biotin/digoxigenin DNA (biotin control DNA is included in the BioPrime kit). Incubate with sheep antibiotin/digoxigenin alkaline phosphatase. Use NBT/BCIP components in the alkaline phosphatase substrate kit IV to visualise spots. Probes are well labelled if the spot intensity is similar to that of the control DNA.
- When denaturating DNA on a slide and fixating DNA, fill a plastic polypropylene jar for slides with 50 ml of the corresponding solutions. These jars and this volume are used for any of the slide washings in all protocols listed in this article.
- If carrying out hybridisation on combed DNA, probe and slide preparation should be timed so that they are both ready for use at the same time. To help ensure that this is achieved, step 5 in Section III,G should coincide with step 10 in Section III,H. If slides are initially put at room temperature and if both protocols proceed according to the times indicated this will happen. If there is a time difference in the two preparations, it is not recommended to shorten incubation or procedure times. If the probes are being prepared more quickly than the slides, they can be left at -80°C, centrifuged, and/or left sitting in the hybridisation buffer for longer times. If slide preparation is proceeding faster than expected, slides can be left at room temperature and/or fixed in EtOH for longer periods of time.
- The advantage of including dextran sulfate in the hybridisation buffer is to increase the hybridisation efficiency of the probe. However, this additive can result in large fluorescent background spots that may obscure signals on the slide. The background level can vary from slide to slide and it is the decision of the researcher as to whether the noise is tolerable. An optional hybridisation buffer containing 50% formamide, 33% detection buffer, 10mM NaCl, 0.5% SDS, and 0.5% N-lauroyl sarcosyl was developed to overcome this problem. Because there is no dextran sulfate, large fluorescent background spots are absent from the slide but hybridisation is less efficient. Proteins and higher concentrations of detergents are included to prevent nonspecific binding of the probe to the slide, thereby increasing its availability for hybridisation. This buffer has been used successfully and it is once again the researcher's decision as to whether this option is suitable.
- The hybridisation temperature of 42°C is standard for hybridising probes on combed DNA. However, the temperature can be tailored to successfully hybridise various probes of different size and sequence content.
- The antibodies have been chosen according to their specificity and sufficient signal brightness on single DNA molecules. Antibodies that have been added or substituted in the various schemes will improve the brightness of the signal. However, they are only compatible with the antibodies for a given detection scheme.
- The green signal in all schemes has been designed to provide enough brightness so that it can be found using the oculars on the microscope. Use the FITC filter to find signals and then take pictures using the camera with the relevant filters to reveal all fluorophore signals.
- The stringency of the washing buffer can be increased by washing with 2x SSC 0.05% Tween 20 instead of 1× PBS after each layer. This helps remove nonspecifically bound antibody and, therefore, reduces the background, although true signal intensity is also decreased slightly. If signals are considered not very bright, it is recommended to continue using 1× PBS for washes.
Acknowledgment
Ronald Lebofsky is supported by the Natural Sciences and Engineering Council of Canada.
Allemand, J.F., Bensimon, D., Jullien, L., Bensimon, A., and Croquette, V. (1997). pH-dependent specific binding and combing of DNA. Biophys. J. 73, 2064-2070.
Anglana, M., Apiou, F., Bensimon, A., and Debatisse, M. (2003). Dynamics of DNA replication in mammalian somatic cells: nucleotide pool modulates origin choice and interorigin spacing. Cell 114, 385-394.
Bensimon, A., Simon, A., Chiffaudel, A., Croquette, V., Heslot, F., and Bensimon, D. (1994). Alignment and sensitive detection of DNA by a moving interface. Science 265, 2096-2098.
Caburet, S., Conti, C., and Bensimon, A. (2002). Combing the genome for genomic instability. Trends Biotechnol. 20, 344-350.
Gad, S., Caux-Moncoutier, V., Pages-Berhouet, S., Gauthier-Villars, M., Coupier, I., Pujol, P., Frenay, M., Gilbert, B., Maugard, C., Bignon, Y.J., Chevrier, A., Rossi, A., Fricker, J.P., Nguyen, T.D., Demange, L., Aurias, A., Bensimon, A., and Stoppa-Lyonnet, D. (2002). Significant contribution of large BRCA1 gene rearrangements in 120 French breast and ovarian cancer families. Oncogene 21, 6841-6847.
Herrick, J. and Bensimon, A. (1999). Imaging of single DNA molecule: applications to high-resolution genomic studies. Chromosome Res. 7, 409-423.
Lengronne, A., Pasero, R, Bensimon, A., and Schwob, E. (2001). Monitoring S phase progression globally and locally using BrdU incorporation in TK(+) yeast strains. Nucleic Acids Res. 29, 1433-1442.
Maho, A., Bensimon, A., Vassart, G., and Parmentier, M. (1999). Mapping of the CCXCR1, CX3CR1, CCBP2, and CCR9 genes to the CCR cluster within the 3p21.3 region of the human genome. Cytogenet. Cell Genet. 87, 265-268.
Michalet, X., Ekong, R., Fougerousse, E, Rousseaux, S., Schurra, C., Hornigold, N., van Slegtenhorst, M., Wolfe, J., Povey, S., Beckmann, J.S., and Bensimon, A. (1997). Dynamic molecular combing: stretching the whole human genome for highresolution studies. Science 277, 1518-1523.
Monier, K., Michalet, X., Lamartine, J., Schurra, C., Heitzmann, F., Yin, L., Cinti, R., Sylla, B.S., Creaven, M., Porta, G., Vourc'h, C., Robert-Nicoud, M., Bensimon, A., and Romeo, G. (1998). Highresolution mapping of the X-linked lymphoproliferative syndrome region by FISH on combed DNA. Cytogenet. Cell. Genet. 81, 259-264.
Pasero, P., Bensimon, A., and Schwob, E. (2002). Single-molecule analysis reveals clustering and epigenetic regulation of replication origins at the yeast rDNA locus. Genes Dev. 16, 2479-2484.
Support our developers


