Handling and Examining Cultures
Microscopic examination of microorganisms provides important information about their morphology but does not tell us much about their biological characteristics. To obtain such information, we need to observe microorganisms in culture. If we are to cultivate them successfully in the laboratory, we must provide them with suitable nutrients, such as protein components, carbohydrates, minerals, vitamins, and moisture in the right composition. This mixture is called a culture medium (plural, media). It may be prepared in liquid form, as a broth, or solidified with agar, a nonnutritive solidifying agent extracted from seaweed. Agar media may be used in tubes as a solid column (called a deep) or as slants, which have a greater surface area (see figs. 2.3 and 2.4). They are also commonly used in petri dishes, or plates, as they are often called.Solid media are essential for isolating and separating bacteria growing together in a specimen collected from a patient, for example, urine or sputum. When a mixture of bacteria is streaked (spread) across the surface of an agar plate, it is diluted out so that single bacterial cells are deposited at certain areas on the plate. These single cells multiply at those sites until a visible aggregate called a colony is formed (see fig. 2.6). Each colony represents the growth of one bacterial species. A single, separated colony can be transferred to another medium, where it will grow as a pure culture. Colonies of several different species are regularly present on the same agar plate when certain patient specimens are inoculated onto them. Work with pure cultures permits the microbiologist to study the properties of individual species without interference from other species. This practice of streaking plates to obtain pure cultures is critical in the hospital laboratory because it allows the microbiologist to determine how many types of bacteria are present, to identify those likely to be causing the patient’s disease, and to test which antimicrobial agents will be effective for treatment.
The appearance of colonial growth on agar media can be very distinctive for individual species. Observation of the noticeable, gross features of colonies, that is, of their colonial morphology, is therefore very important. The color, density, consistency, surface texture, shape, and size of colonies all should be observed, for these features can provide clues as to the identity of an organism, although final identification cannot be made by morphology alone (fig. 2.1a).
In liquid media, some bacteria grow diffusely, producing uniform clouding, whereas others look very granular. Layering of growth at the top, center, or bottom of a broth tube reveals something of the organisms’ oxygen requirements. Sometimes colonial aggregates are formed and the bacterial growth appears as small puff balls floating in the broth. Observation of such features can also be helpful in recognizing types of organisms (fig. 2.1b).
You must learn how to handle cultures aseptically. The organisms must not be permitted to contaminate the worker or the environment, and the cultures must not be contaminated with extraneous organisms. In this exercise, you will use cultures containing environmental organisms or organisms of low pathogenic potential. Nonetheless, you should handle them carefully to avoid contaminating yourself and your neighbors. Also, if you contaminate the cultures, your results will be spoiled. Before you begin, reread the opening paragraphs of Section I dealing with safety procedures and general laboratory directions (pp. 3–5).
 |
| Figure 2.1 Examples of bacterial growth patterns.(a) Some colonial characteristics on agar media. Characteristics of the colony edges may be distinctive for many bacterial species. The shapes and elevations shown in the two rows of sketches are not intended to be matched. (b) Some growth patterns in broth media. |
| Purpose | To make aseptic transfers of pure cultures and to examine them for important gross features |
| Materials | 4 tubes of nutrient broth 4 slants of nutrient agar One 24-hour slant culture of Escherichia coli One 24-hour slant culture of Bacillus subtilis One 24-hour slant culture of Serratia marcescens (pigmented) One 24-hour plate culture of Serratia marcescens (pigmented) Wire inoculating loop Bunsen burner (and matches) or electric bacterial incinerator China-marking pencil or waterproof pen (or labels) A short ruler with millimeter markings |
Procedures
- Transfer of a Slant Culture to a Nutrient Broth
- The procedure will be demonstrated. Watch carefully and then do it yourself, following directions given.
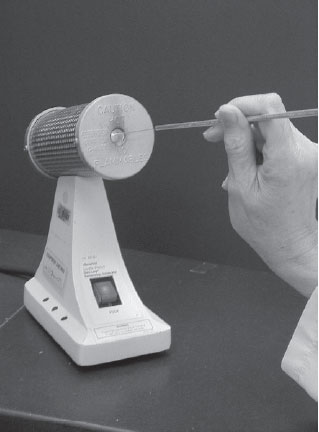
- Take up the inoculating loop by the handle and hold it as you would a pencil, loop down. Hold the wire in the flame of the Bunsen burner or in the bacterial incinerator until it glows red (fig. 2.2). Remove loop and hold it steady a few moments until cool. Do not wave it around, put it down, or touch it to anything.
- Pick up the slant culture of Escherichia coli with your left hand. Still holding the loop like a pencil, but more horizontally, in your right hand, use the little finger of the loop hand to remove the closure (cotton plug, slip-on, or screw cap) of the culture tube. Keep your little finger curled around this closure when it is free—do not place it on the table (fig. 2.3).
- Insert the loop into the open tube (holding both horizontally). Touch the loop (not the handle!) to the growth on the slant and remove a loopful of culture. Don’t dig the loop into the agar; merely scrape a small surface area gently.
- Withdraw the loop slowly and steadily, being careful not to touch it to the mouth of the tube. Keep it steady, and do not touch it to anything (it’s loaded!) while you replace the tube closure and put the tube back in the rack.
- Still holding the loop steady in one hand, use the other hand to pick up a tube of sterile nutrient broth from the rack. Now remove the tube closure, as you did before, with the little finger of the loop hand (don’t wave or jar the loop). Insert the loop into the tube and down into the broth. Gently rub the loop against the wall of the tube (don’t agitate or splash the broth), making sure the liquid covers the area but does not touch the loop handle.
- As you withdraw the loop, touch it to the inside wall of the tube (not the tube’s mouth) to remove excess fluid from it. Pull it out without touching it again, replace the closure, and put the tube back in the rack.
- Now carefully sterilize the loop. If you are using a Bunsen burner, hold it first in the coolest part of the flame (yellow), then in the hot blue cone until it glows. Be sure all of the wire is sterilized, but do not burn the handle. When the wire has cooled, the loop can be placed on the bench top.
- Label the tube you have just inoculated with your name, the name of the organism, and the date.
- Repeat steps 2 through 9 with each of the other two slant cultures (Bacillus subtilis and Serratia marcescens).
- Transfer of a Slant Culture to a Nutrient Agar Slant
- Start again with sterilizing the loop.
- Pick up the slant culture of E. coli, open it, and take up some growth on the sterile loop.
- Recap the culture tube carefully and replace it in the rack. Pick up and open a sterile nutrient agar slant (keep the charged loop steady meantime).
- Introduce the charged loop into the fresh tube of agar, and without touching any surface, pass it down the tube to the deep end of the slant. Streak the agar slant by lightly touching the loop to the surface of the agar, swishing it back and forth two or three times (don’t dig up the agar), then zigzaging it upward to the top of the slant. Lift the loop from the agar surface and withdraw it from the tube without touching the tube surfaces (fig. 2.4).
- Close and replace the inoculated tube in the rack; then sterilize the loop as before. 6. Label the freshly inoculated tube with your name, the name of the organism, and the date. 7. Repeat steps 1 through 6 of procedure B with each of the other two slant cultures provided (B. subtilis and S. marcescens).
- Transfer of a Single Bacterial Colony on a Plate Culture to a Nutrient Broth and a Nutrient Agar Slant
- Start again with sterilizing the loop.
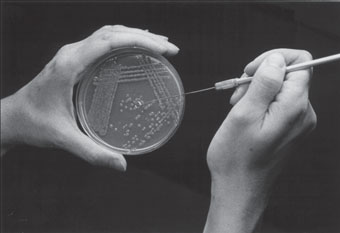
- Hold the sterile, cooling loop in one hand and with the other hand turn the assigned plate culture of Serratia marcescens so that it is positioned with the bottom (smaller) part of the dish up. Lift this part of the dish with your free hand (fig. 2.5) and turn it so that you can clearly see isolated colonies of S. marcescens growing on the surface of the plated agar.
- With the sterile, cool loop, touch the surface of one isolated bacterial colony (fig. 2.6). Withdraw the loop and replace the bottom part of the dish into the inverted top lying open on the table.
- Now inoculate a sterile nutrient broth with the charged loop, as in procedure A, steps 6 through 9.
- Sterilize the loop again, open the plate, pick another colony, close the plate, and inoculate a sterile agar slant as in procedure B, steps 4 through 6.
- Incubation of Freshly Inoculated Cultures
- Make certain all the broths (4) and slants (4) you have inoculated are properly and fully labeled.
- Place your transferred cultures in an assigned rack in the incubator. The incubator temperature should be 35 to 37°C.
- Examination of Culture Growth
- When you have finished making the culture transfers as directed, take a few minutes to look closely at the grown cultures with which you have been working. In the Results section of this exercise, there are blank forms in which you can record information as to the appearance of these cultures, specifically: size of colonies (in mm), color, density (translucent? opaque?), consistency (creamy? dry? flaky?), surface texture (smooth? rough?), and shape of colony (margin even or serrated? flat? heaped?).
- When the cultures you have made have grown out, record their appearance in broth or on slants, using the blank form in the Results section. Provide all the information the form requires, as in procedure E.1.
|
|||
| Figure 2.2 Sterilizing the wire inoculating loop in the flame of a Bunsen burner (left) or a bacterial incinerator (right). |
 |
| Figure 2.3 Inoculating a culture tube. Notice that the tube is held almost horizontally. Its cap is tucked in the little finger of the right hand, which holds the inoculating loop. |
 |
| Figure 2.4 Streaking an agar slant with the loop. |
|
|
Results
Record your observations of all cultures in the tables or diagram. Consult section E.1 and figure 2.1 (Examination of Culture Growth) for appropriate descriptive terms.
- Slant cultures from which you made your inoculations.

- Colonies on plate culture of S. marcescens.
*With your ruler, measure the diameter of the average colony on the plate culture by placing the ruler on the bottom of the plate. Hold plate and ruler against the light to make your readings.
- The slant cultures you inoculated at the previous session.
*Inoculated from culture plate.
 |
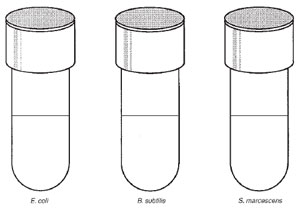
4. Refer to the bottom portion of figure 2.1 and shade in the type of growth you observed in your broth cultures.


