Simple Stains
As we have seen, wet mounts of bacterial cultures can be very informative, but they have limitations. Bacteria bounce about in fluid suspensions with Brownian movement or true motility, and are difficult to visualize sharply. We can see their shapes and observe their activity under a cover glass, but it is difficult to form a complete idea of their morphology. An important part of the problem is the minute size of bacteria. Because they are so small and have so little substance, they tend to be transparent, even when magnified in subdued light. The trick, then, is to find ways to stop their motion and tag their structures with something that will make them more visible to the human eye. Many sophisticated ways of doing this are known, but the simplest is to smear out a bacterial suspension on a glass slide, “fix” the organisms to the slide, then stain them with a visible dye (Koch and his coworkers first thought of this more than 100 years ago).The best bacterial stains are aniline dyes (synthetic organic dyes made from coal-tar products). When they are used directly on fixed bacterial smears, the contours of bacterial bodies are clearly seen. These dyes react in either an acidic, basic, or neutral manner. Acidic or basic stains are used primarily in bacteriologic work. The free ions of acidic dyes are anions (negatively charged) that combine with cations of a base in the stained cell to form a salt. Basic dyes possess cations (positively charged) that combine with an acid in the stained material to form a salt. Bacterial cells are rich in ribonucleic acid (contained in their abundant ribosomes) and therefore stain very well with basic dyes. Neutral stains are made by combining acidic and basic dyes. They are most useful for staining complex cells of higher forms because they permit differentiation of interior structures, some of which are basic, some acidic. Cells and structures that stain with basic dyes are said to be basophilic. Those that stain with acid dyes are termed acidophilic.
Stained bacteria can be measured for size and are classified by their shapes and groupings. Bacteria are so small that their size is most conveniently expressed in micrometers (symbol µm). A micrometer is a thousandth part of a millimeter, and 1/10,000 of a centimeter, or 1/25,400 of an inch. Bacteria vary in length and diameter, the smallest being about 0.5 to 1 µm long and approximately 0.5 µm in diameter, whereas the largest filamentous forms may be as long as 100 µm. Most of those you will see in this course are at the small end of the scale, measuring about 1 to 3 µm in length. Small as they are in reality, their images should loom large in your mind as the agents of infection in patients for whom you will be caring.
Bacteria have rigid cell walls and maintain a constant shape. Therefore, they can be classified on the basis of their form. Bacteria have three basic shapes: spherical (round), rod shaped, or spiraled (fig. 4.1). A round bacterium is called a coccus (plural, cocci ). A rod-shaped organism is called a bacillus (plural, bacilli ) or simply a rod. A spiraled bacterium with at least two or three curves in its body is called a spirillum (plural, spirilla). Long sinuous organisms with many loose or tight coils are called spirochetes.
The patterns formed by bacterial cells grouping together as they multiply are often characteristic for individual bacterial genera or species. Cocci may occur in pairs (diplococci ), chains (streptococci ), clusters (staphylococci ), or packets of four (tetrads), and are seldom found singly.
Rod-shaped bacteria (bacilli) generally occur as individual cells, but they may appear as end-to-end pairs (diplobacilli ) or line up in chains (streptobacilli ). Some species tend to palisade, that is, line up in bundles of parallel bacilli, others may form V, X, or Y figures as they divide and split. Some may show great variation in their size and length (pleomorphism).
Spiraled bacteria occur singly and usually do not form group patterns. Examine Colorplates 1-8 to see representative examples of bacterial morphology.
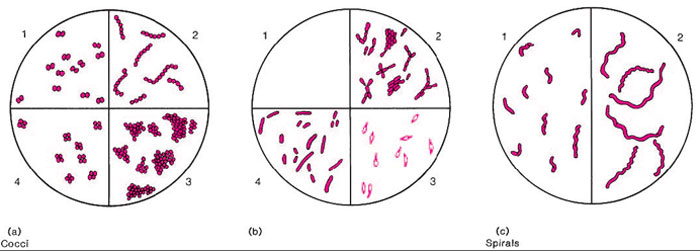 |
| Figure 4.1 Basic shapes and arrangements of bacteria. (a) Cocci. 1. Diplococci (pairs); 2. Streptococci (chains); 3. Staphylococci (grapelike clusters); 4. Tetrads (packets of four). (b) Bacilli (rods). 1. Streptobacilli (chains); 2. Palisades; V, X, and Y figures, clubbing; 3. Endospore-forming bacilli (note endospores as small, round, hollow, unstained areas, within or at one end of bacillary bodies); 4. A bacillus showing pleomorphism (note varying widths and lengths). (c) Spirals. 1. Spirilla (short curved or spiraled forms with rigid bodies); 2. Spirochetes (long tightly or loosely coiled forms with sinuous flexible bodies). |
| Purpose | To learn the value of simple stains in studying basic microbial morphology |
| Materials | 24-hour agar culture of Staphylococcus epidermidis 24-hour agar culture of Bacillus subtilis 24-hour agar culture of Escherichia coli Prepared stained smear of a spiraled organism Methylene blue Absolute methanol (if bacterial incinerator used) Safranin Toothpicks Slides China-marking pencil or permanent marking pen |
Procedures
- Slides for microscopic smears must always be sparkling clean. They may be stored or dipped in alcohol and polished clean (free of grease) with a tissue or soft cloth.
- Take three clean slides and with your marking pencil or pen make a circle (about 1 1/2 cm in diameter) in the center. At one end of the slide write the initials of one of the three assigned organisms (your three slides should read Se, Bs, and Ec, respectively).
- Turn the slides over so that the unmarked side is up. (When slides are to be stained, pen or pencil markings should always be placed on the underside so that the mark will not smear, wash off, or run into the smear itself).
- With your inoculating loop, place a loopful of water in the ringed area of the slide. Using proper aseptic transfer techniques, mix a small amount of bacteria in the water and spread it out. Repeat this step until smears of all three organisms have been made.
- Allow the smears to air dry. You should be able to see a thin white film on each slide. If not, add another loopful of water and more bacteria as in step 4.
- Heat-fix the smears by passing the slides rapidly through the Bunsen flame three times so that the smears will not wash off. If a Bunsen burner is not available, fix the smears by placing the slides on a staining rack and flooding them with absolute methanol. Allow the slides to sit for one minute, then drain off the alcohol and air dry them completely.
- Place the slides on a staining rack and flood them with methylene blue. Leave the stain on for three minutes.
- Wash each slide gently with distilled water, drain off excess water, blot (do not rub) with bibulous paper, and let the slides dry completely in air.
- While the slides are drying, take two more clean slides and draw a circle on the bottom with your wax pencil or marking pen.
- Place a loopful of distilled water (or sterile saline) over the circle on each slide.
- With the flat end of a toothpick, scrape some material from the surface of your teeth and around the gums. Emulsify the material in the drop of water on one slide. Repeat this procedure on the other slide.
- Allow both slides to dry in air; then fix them with heat or methanol. Stain one slide with methylene blue for three minutes and the other with safranin for three minutes.
- Wash, drain, and dry the slides as in step 8.
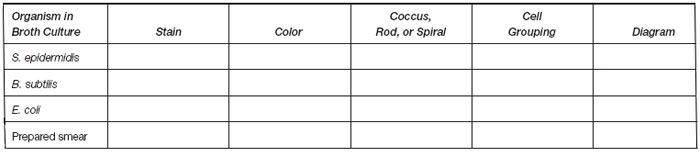
- Examine all slides, including the prepared stained smear assigned to you, with all three microscope objectives. Record your results in the table.
Results
 |
| Draw the organisms you saw in the scraping from your teeth. Describe the results you obtained with the two stains used. Which provided the sharpest view? |
|
Support our developers


