Streaking Technique to Obtain Pure Cultures
The skin and many mucosal surfaces of the human body support large numbers of microorganisms that comprise the normal, or indigenous, flora. When clinical specimens are collected from these surfaces and cultured, any pathogenic microorganisms being sought must be recognized among, and isolated from, other harmless organisms. Colonies of the pathogenic species must be picked out of the mixed culture and grown in isolated pure culture. The microbiologist can then proceed to identify the isolated organism by examining its biochemical and immunological properties. Pure culture technique is critical to successful, accurate identification of microorganisms (see colorplates 11-13).| Purpose | A. To isolate pure cultures from a specimen containing mixed flora B. To culture and study the normal flora of the mouth |
| Materials | Nutrient agar plates* Blood agar plates Sterile swabs A mixed broth culture containing Serratia marcescens (pigmented), Escherichia coli, and Staphylococcus epidermidis A demonstration plate culture made from this broth, showing colonies isolated by good streaking technique Glass slides Gram-stain reagents |
Procedures
- Streaking a Mixed Broth Culture for Colony Isolation
- Make certain the contents of the broth culture tube are evenly mixed.
- Place a loopful of broth culture on the surface of a nutrient agar plate, near but not touching the edge. With the loop flat against the agar surface, lightly streak the inoculum back and forth over approximately one-eighth the area of the plate; do not dig up the agar (fig. 9.1, area A).
- Sterilize the loop and let it cool in air.
- Rotate the open plate in your left hand so that you can streak a series of four lines back and forth, each passing through the inoculum and extending across one side of the plate (fig. 9.1, area B).
- Sterilize the loop again and let it cool in air.
- Rotate the plate and streak another series of four lines, each crossing the end of the last four streaks and extending across the adjacent side of the plate (fig. 9.1, area C).
- Rotate the plate and repeat this parallel streaking once more (fig. 9.1, area D).
- Finally, make a few streaks in the untouched center of the plate (fig. 9.1, area E). Do not touch the original inoculum.
- Incubate the plate (inverted) at 35°C.
- Taking a Culture from the Mouth
- Rotate a sterile swab over the surface of your tongue and gums.
- Roll the swab over a small 1½-cm square of surface of a blood agar plate, near but not touching one edge (see fig. 9.1, area A). Rotate the swab fully in this area.
- Discard the swab in a container of disinfectant.
- Using an inoculating loop, streak the plate as in figure 9.1.
- Incubate the plate (inverted) at 35°C.
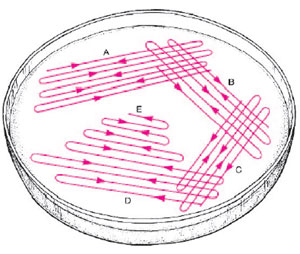 |
| Figure 9.1 Diagram of plate streaking technique. The goal is to thin the numbers of bacteria growing in each successive area of the plate as it is rotated and streaked so that isolated colonies will appear in sections D and E. |
Results
- Examination of Plate Streaked from Mixed Broth Culture
- Examine the incubated nutrient agar plate carefully. Compare your streaking with that illustrated in figure 9.2a and b.
Make a drawing showing the intensity of growth in each streaked area.
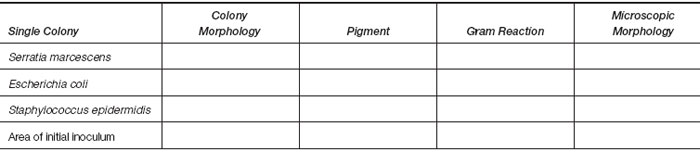
- Describe each different type of colony you can distinguish.
- Make a Gram stain of one isolated colony of each type present. Also prepare a Gram stain of the growth in the area where the initial inoculum was placed. (Note: when a stain is to be made of colonies on an agar medium, place a loopful of sterile water or saline on the slide first and then emulsify the picked growth in this drop. Allow to air dry, fix the slide by heat or methanol, and stain).
- Record your observations in the table provided.
- Examination of Mouth Culture on Blood Agar Plate
- How many different types of colonies can you find on the blood agar plate?
Describe each. - Make a Gram stain of each of three different colonies. Record the Gram reaction of each, and sketch its microscopic morphology in the circles.
- Discard the blood agar plate in a container marked CONTAMINATED.
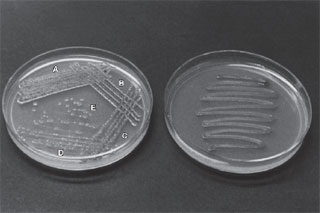 |
| Figure 9.2 Plate streaking. (a) Notice how the proper technique is designed to yield isolated colonies in areas D and E. (b) Poorstreaking does not provide separation of colonies. |
 |
 |
Support our developers

© 2012 - 2025 Biocyclopedia
Login to your account
- OR -
Login / Signup with


