Balances and weighing
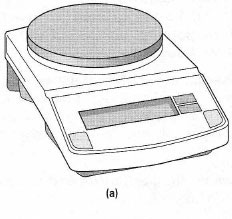
Electronic single-pan balances with digital readouts are now favoured over mechanical types and are common in most laboratories. There are essentially two types of balance:- General purpose balances which weigh to the nearest 0.01 g with a capacity of about 300 g. Chemicals may be dispensed for weighing, into a suitable weighing container, directly onto these balances.
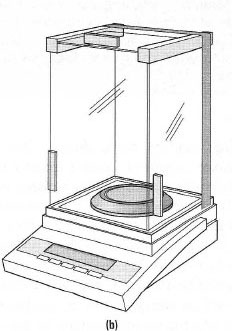
- Analytical four-figure balances for quantitative work, which weigh to the nearest 0.0001 g (0.1 mg) and have a maximum capacity of about 100 g. Chemicals must not be transferred onto the balance at any time and analytical balances must only be used for weighing by difference.
General-purpose balances The most useful feature of this type of balance is the electronic zero facility (self-taring), which means the mass of the weighing container can be subtracted automatically before weighing chemicals. To operate a standard self-taring balance:
|
|
Analytical balances These are delicate precision instruments and as such are likely to be found away from the open laboratory in draught-free conditions on a vibrationdampened surface. Analytical balances are maintained to the highest specifications and should need no adjustments on your part, such as levelling and zero adjustment. The key points for using an analytical balance are summarized below:
|
|
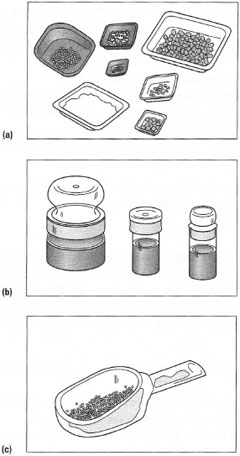
Weighing containers These come in various materials, shapes and sizes: from glass weighing boats to beakers and even special glazed paper. The weighing container to be used depends on several factors:
For analytical procedures, only weighing boats, weighing bottles or glass or plastic sample tubes should be used. Weighing boats are used to transfer a solid directly into a volumetric flask via the neck of the weighing boat: this procedure* is recommended when the chemical is known to be totally soluble in the solvent and allows you to omit the solution preparation stage in a beaker or conical flask. You must ensure that the neck of the weighing boat will fit well inside the ground-glass joint of the neck of the volumetric flask so that all the chemical can be washed down the sides of the volumetric flask and does not stick to the ground-glass joint during the quantitative transfer. For general-purpose work, weighings can be made directly into preweighed or 'tared' conical flasks or beakers, again to avoid a transfer stage. Much more common is the use of disposable plastic weighing dishes of the appropriate size. The edges of these dishes can be squeezed together to form a 'funnel' to prevent losses when transferring the solid. Remember that plastic disposable dishes may dissolve in organic solvents such as prop anone (acetone), toluene, etc., and should not be used for low-melting organic solids or liquids. Watch- and clock-glasses should be avoided if you wish to transfer the solid into narrow-necked vessels such as conical flasks or sample tubes since it very difficult to direct the solid into the narrow opening of the vessel from the large 'flat' surface of the watch- or clock-glass. In such cases, or when large amounts of solid are to be transferred, it is advisable to use a wide-necked filter funnel called a 'powder funnel'. |
|
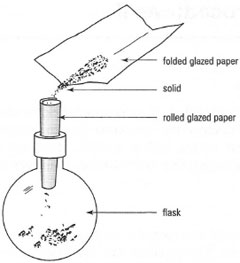
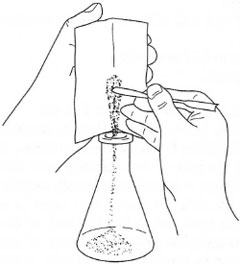
In many preparative experiments, which are carried out on a small scale (involving I g to 10g of solids), the most useful weighing container is special glazed paper, provided that the chemicals do not react with the paper. A creased square of glazed paper is 'tared' on the balance pan and the solid weighed out directly onto it. The chemical can then be allowed to flow down the crease into the vessel (Fig. 4.5). Furthermore, when attempting to transfer small amounts of solid in vessels with narrow-bore ground-glass joints it is important not to allow the solid to contact the joint, because the joint will not seal correctly. Use a filter funnel or roll a piece of glazed paper into a funnel, insert the stem of the paper funnel to below the joint and then run in the solid from the creased weighing paper (Fig. 4.6). Paper used in this manner is much cheaper than proprietary weighing dishes and is a useful method of recycling out-of-date manufacturers' catalogues!
|
|
Procedure:*How to weigh out a sample of a solid for use in quantitative analysis.
- Place the clean, dry weighing boat or sample tube on a general-purpose two-decimal-place balance and zero the balance.
- Weigh out the calculated amount of chemical within the accuracy of the balance.
- Check the zero reading on the analytical balance by pressing the bar/button with the balance doors closed.
- Relock the balance pan by pressing the bar/button.
- Carefully transfer the weighing boat or sample tube to the balance pan of the analytical balance (for very acurate work use tweezers or the tongs since the sweat from your fingers will contribute to the weight recorded) and close the balance door.
- Release the balance pan by pressing the bar/button, allow the balance to stabilize and record the weight of the chemical and container. If the last decimal place 'cycles' between two or three numbers, determine the mid-point of the 'cycle' and record this value as the weight.
- Lock the balance pan by pressing the bar/button, remove the sample container and transfer the solid to your volumetric flask, beaker or conical flask by pouring, but do not wet the weighing boat or sample tube with solvent.
- Replace the weighing container on the analytical balance pan, close the balance door and weigh if the last decimal place 'cycles' and record this value as the weight of the 'empty' weighing container.
- Lock the balance pan by pressing the bar/button and remove the weighing container from the balance.
- Subtract the weight of the 'empty' weighing cotainer from that of the weighing container plus sample and you now know the mass of chemical, to an accuracy of four decimal places, which has been transferred into your volumetric flask, beaker or conical flask.
Support our developers


