Drying
During your laboratory course it will be necessary to dry glassware, analytical standard compounds, chemicals you have synthesized, crucibles used in gravimetric analysis and solvents.Drying glassware
For most general laboratory applications glassware can be dried in an electric oven between 80°C and 90°C or by rinsing the glassware with a small amount of water-miscible solvent, such as acetone or ethanol, and then evaporating the solvent using a compressed-air jet. Remember to remove all plastic components, taps and stoppers from the glassware before you put it in the oven.
If glassware is required for anhydrous reactions, it must be heated in the oven above 100 QC, assembled while hot and allowed to cool while a stream of inert gas is passed through it.
Drying solids
Here the term 'drying' means removal of a solvent, not specifically water, from a solid by evaporation. The rate of evaporation and thus the rate of drying can be increased by one (or all) of the following:
- Heating the chemical.
- Using a drying agent in a closed container to absorb the solvent.
- Reducing the atmospheric pressure.
Only chemicals which are thermally stable should be dried by heating.
Most inorganic compounds, which are salts with relatively high melting
points, can be dried in an electric oven to remove water, whereas organic
compounds, many of which have relatively low melting points, need to be
treated with more care and the oven temperature should be set between 30°C
and 50°C below the melting point of the chemical. Chemicals must be placed
in the oven on a clock-glass or watch-glass and be spread as thinly as
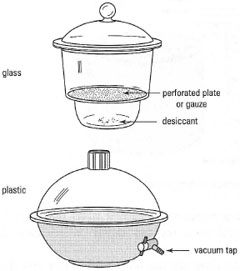
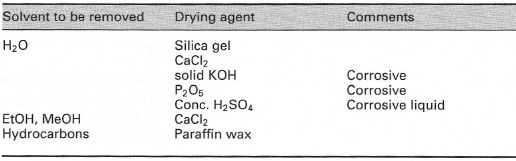
possible, to increase the rate of solvent evaporation. If you cannot dry your compound in the oven, then use a desiccator. Desiccators are made from glass or plastic and some, vacuum desiccators, are equipped with a tap to allow evacuation as shown in Fig. 5.18. The bottom of the desiccator is filled with a drying agent (desiccant) and the chemical, on a watch-glass or clock-glass, is placed on the mesh shelf above and the desiccator closed by sliding the lid onto the desiccator to provide an air-tight seal. The desiccant absorbs the solvent from the 'atmosphere' in the desiccator as it evaporates from the solid. The nature of the desiccant depends upon the solvent to be removed (Table 5.4). |
|
The most common drying agents for removal of water are anhydrous CaCl2 and self-indicating silica gel. The CaCl2 should have the appearance of 'chalky' lumps. Self-indicating silica gel is blue in the 'active' state and pink when its capacity for water absorption is 'exhausted'. The water can be removed from the pink silica gel by heating in an oven above 100°C and restoration of the blue colour indicates reactivation.
 |
| Table 5.4 Drying agents for desiccators |
The rate of drying can be increased by evacuating the desiccator and
vacuum desiccators are specially designed for this purpose. The principal
steps for the use of a vacuum desiccator are as follows and it is essential that
you follow the order of the operations:
|
|
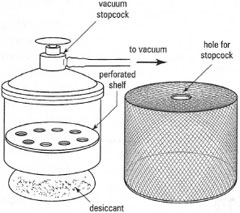
- Place the lid on the desiccator and open the tap and cover the desiccator with an appropriately sized safety cage (Fig. 5.19) to prevent injury from flying glass in the case of an implosion.
- Connect the tap to an operating source of vacuum: a water pump (p. 30) or vacuum pump and open the tap slowly to evacuate the desiccator.
- When drying appears complete, close the tap on the dessicator and then disconnect the vacuum supply.
- Place a small piece of filter paper on the end of the tap and open the tap slowly. The filter paper will stick to the tap as air is drawn slowly through it. When the air has completely filled the desiccator, the filter paper will fall off and it is safe to open the desiccator.
Drying liquids
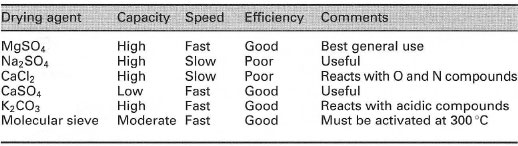
This usually means removing water from a liquid chemical or a solution of a chemical in a water-immiscible solvent. You will always need to dry solutions after a liquid-liquid extraction and you may need to dry liquids after evaporation or distillation. In both cases the liquid is placed in direct contact with the solid drying agent, i.e. the drying agent is added to the liquid or solution. Ideally the drying agent should be totally insoluble in the liquid, should not react with it, absorb the water quickly and efficiently, and be easily filtered off. A list of the common drying agents is given in Table 5.5.
 |
| Table 5.5 Drying agents for liquids and solutions |
Speed: rate of water absorption.
Efficiency: extent of drying after treatment.
You must remember that the drying agent will absorb some of the liquid or solvent being dried as well as the water. If you wish to dry a small volume of liquid, it is better to dissolve it in a low-boiling water-immiscible solvent and dry the solution by the procedure described below:
- Place the solution to be dried in a clean dry conical flask. The flask should not be more than half-full.
- Add small quantities of MgSO4 (between 0.1g and 1.0g depending upon the volume of solvent) and swirl the conical flask between each addition. At first the MgSO4 will 'stick' to the sides and bottom ot the flask where it contacts with the water, but on further additions it will eventually form a free-flowing powder in the liquid and solution will appear very clear and bright.
- Allow the mixture to stand for 10 minutes.
- Gravity filter the dried solvent layer through a fluted filter paper into a clean, dry flask. The flutes filter paper should contain a small amount of fresh MgSO4 as safety precaution, in case a few drops of water are floating in the surface of a denser solvent than water.
- Rinse the MgSO4in the conical flask with a few mililiters of pure dry solvent and filter it, to ensure that you recover all the solute, and then rinse the MgSO4 on the filter paper.
- Remove the solvent by rotary evaporation or distillation.
Support our developers


