In the laboratory you will be required to heat chemicals in dissolution of a
solid, promotion of reaction (reflux), distillation of pure compounds and
mixtures, extraction, coagulation of precipitates, drying solid compounds, etc.
Your choice of heat source depends upon several factors:
- First and foremost, the flammability and volatility of the chemical and
solvent.
- The operation to be carried out, e.g. simple preparation of a solution,
reflux or distillation.
- The temperature required for the process.
- The amount of chemical or solvent to be heated.
Bumping
Before you attempt to heat any liquid or solution you must take precautions
to prevent 'bumping'. This is when the liquid suddenly boils without any
warning and results in hot liquid and vapour shooting uncontrollably out of
the container. 'Bumping' can occur during simple heating in a test tube,
conical flask or beaker or in more complex situations such as reflux and
distillation. It is necessary to provide a point in the liquid or solution where
vaporization of the liquid can occur in a controlled manner.
Before you start heating a liquid or solution you must
always take one of
the following 'anti-bumping' precautions:
- Add one or two 'boiling stones' or 'anti-bumping granules'; these can be
filtered off later in the process.
- Add a Pyrex® glass rod to the beaker or conical flask. The rod must be
longer than the container so that it can be removed and rinsed before the
solution is used further.
- Add a 'boiling stick': these are thin pieces of wood sold as 'wooden
applicators', but you must be sure that nothing will be extracted from the
wood into your solution.
- Stir the liquid or solution with a magnetic 'flea' which should
be removed before further processing of the chemicals.
- Stir the liquid or solution with a mechanical stirrer.
- Use an air or inert gas (nitrogen) capillary bleed during vacuum distillation.
*Note: Make sure that you add the anti-bumping device
before you start heating since uncontrolled boiling may occur immediately.
You
must allow the liquid to cool back to room temperature and
then add the anti-bumping device.
Burners
Gas burners come in two common forms: large burners called Bunsen
burners and small burners known as microburners (Fig. 5.9). Bunsen burners
are commonly used for heating aqueous solutions in flat-bottomed pyrex®
vessels supported on a tripod and wire gauze (Fig. 5.10) but for many other
heating applications Bunsen burners do not provide adequate control.
Microburners may be used for direct heating of round-bottom or pearshaped
glassware in small-scale operations where good control of the heating
rate is required, such as distillation or determination of melting point. When using a microburner for heating make sure that you do not
create a 'hot spot', which may result in uneven heating of the liquid and
'bumping', by 'waving' the flame around the flask starting just below the
level of the liquid and working down to the bottom of the flask and back
again.
Microburners are also useful for heating boiling tubes and test tubes,
sealing the ends of melting point tubes, making micropipettes for
chromatography and bending the ends of Pasteur pipettes for
special purposes.
 |
Fig. 5.9 (a) Bunsen burner;
(b) microburner. |
|
|
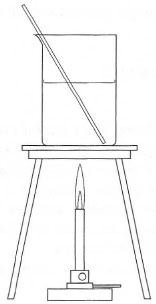
| Fig. 5.10 Heating an aqueous solution using a Bunsen burner. |
|
To use a burner, first make sure that the gas piping, is attached
securely to both the burner and the gas tap, is of the correct type of rubber tubing, and is not damaged. Close the movable collar and light the
gas with a gas igniter: do not use a splint or a piece of burning paper in
case you cause a fire in the waste bin when disposing of the paper. Open
the collar to produce a hot blue flame and adjust the gas flow to give the
required size of flame. If your work is interrupted, close the collar a little
to produce a luminous flame. Finally, when the operations are complete,
turn off the gas and do not pick up the burner by the barrel, or put it
into a cupboard, until it has cooled.
The advantages of the burner are that the heat source can be removed
instantly from the apparatus and that the flame is visible: in contrast you
often cannot distinguish between a cold and hot metal surface. The
disadvantages are those of an open flame.
Steam baths and water baths
These are heat sources, which have a maximum temperature of 100°C; they
are safe to use even with most flammable chemicals and solvents and they
differ only in the way the steam is produced.
Water baths are the more common of the two, and the steam is
generated by heating water with an electric element - just like a kettle. The
element may have a thermostatic control, which can control the
temperature of the water to some extent. Most water baths have a constant
level device on the side of the bath, which supplies water to the bath to a
fixed level above the heating element and prevents the water bath from
boiling dry. Water baths are 'single hole' or 'multiple hole' types, and the
holes are covered by concentric metal or plastic rings, which allows you to
vary the size of the hole.
When you are to use a water bath, make sure that water is flowing into
and out of the bath via the constant level device - check that water is flowing
from the pipe into the drain. Turn on the controller to the level you require -
the power can be turned down once the bath is boiling.
A steam bath looks like the 'single hole' water bath except that there is no
heating element and no constant level device. Steam baths require piped
steam as their source of heat usually provided by a steam line, which is a
permanent supply in the laboratory.
Beakers and conical flasks sit firmly on the rings, while round-bottom and
pear-shaped flasks should have about half the surface of the flask immersed
in the steam (Fig. 5.11).
The main advantage of a water bath is the minimal risk of fire, while the
major disadvantages are the maximum temperature available (~100°C)
and the special precautions needed if anhydrous reaction conditions are
required: remember that steam will condense down the
inside of reflux
condensers.
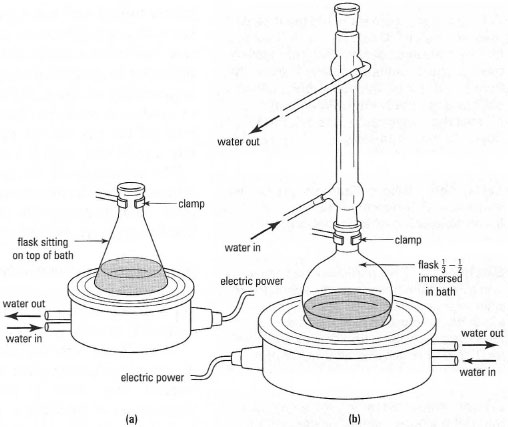 |
| Fig. 5.11 (a) Heating a conical flask on a water bath; (b) heating a reflux set-up on a water bath. |
Hot plates and stirrer hot plates
These consist of a flat metal or ceramic plate, which is heated electrically, and
varies in size for use by an individual or by several people at the same time.
The small versions normally have a built-in magnetic stirrer, which can be
used to stir the liquid with a magnetic 'flea'.
Hot plates of both types should only be used for heating flat-bottom
vessels such as beakers or conical flasks and only when the liquid being
heated is non-flammable. The vapour of a flammable liquid may 'run' down
the outside of the vessel and ignite on the hot metal of the heating surface.
Since the contact area between the heating surface and a round-bottom flask is very small, your attempts to heat these flasks effectively will require
excessive temperatures of the heating surface, which increases the dangers due
to lack of control of the heating process. Therefore round-bottom flasks
should only be heated using an oil bath (below) or a mantle.
The flat exposed heating plate is extremely dangerous when hot: always
check that the plate is cool by passing your hand over the plate without
touching it or by placing a drop of water on the plate. If you have to pick up
a hot plate, hold it by the sides and do not touch the plate; it may burn.
Typical uses of hot plates are illustrated in Fig. 5.12a.
Oil baths
These are mostly used to heat round-bottom flasks at temperatures above
100°C. The oil bath, containing the heating fluid, is usually a non-ferrous
metal or Pyrex ® dish and heated on a stirrer hot plate, and the temperature
of the bath is measured with a thermometer. The oil bath should never be
more than half-full, to allow a margin of safety for thermal expansion of the
oil, and stirred with a magnetic 'flea' to ensure even heating. The equipment
used in a typical oil bath is shown in Fig. 5.12b.
The nature of the oil used in the bath depends upon the temperature range
required and a selection of liquids is shown in Table 5.l.
You are most likely to encounter paraffin oil baths during your laboratory
work and the following safety points should be considered:
- Paraffin oil discolours rapidly with prolonged heating. If the oil is dark,
replace it with fresh oil. Dispose of the old oil in an appropriate manner
(check with laboratory staff).
- Check that there is no water in the bottom of the oil bath: look for a
separate layer or globules of liquid in the bottom of the bath. If you heat the bath above 100°C, the water will boil and may spatter hot oil over
you and the apparatus. Dispose of the contaminated oil into the
appropriate waste container, clean the bath with paper towels to absorb
the water and refill with fresh oil once completely dry.
- If the oil bath is a Pyrex@ dish, check the dish carefully for cracks and
'star' cracks because you do not do want the dish of hot oil to break.
- Support the stirrer hot plate on a 'labjack' so that you can quickly
remove the heat source if the reaction goes wrong.
- When the heating process is finished, allow the bath to cool and raise the
flask, let the oil drain from it into the bath and then wipe the flask with a
cloth or paper towel. Otherwise your hands, gloves, apparatus, compounds,
etc., may become contaminated with oil.
|
|
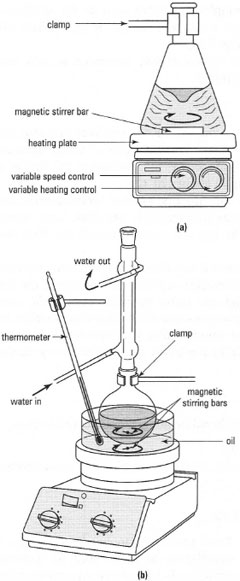 |
| Fig. 5.12 (a) A stirrer hot plate. (b) Using a stirrer hot plate with an oil bath to heat a round-bottom flask. |
|
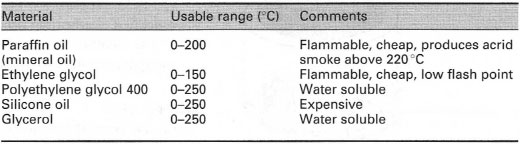 |
| Table 5.1 Oil bath liquids |
Electric heating mantles
These are used for heating round-bottom flasks only and come in various sizes.
Always used a heating mantle appropriate to the size of the flask you are going
to heat, since you need to control the heating process. The flask should fit snugly
into the mantle with the top half of the flask above the case of the mantle. If the
mantle is too small, heating will be inefficient, whereas if the mantle is too big,
the flask will be overheated and decomposition of the contents may occur.
Electric heating mantles comprise an electric heating element wrapped in a
glass fibre covering, protected by an earth screen and enclosed in an
aluminium or, more commonly, a polypropylene case to allow handling at
moderate temperatures. Heating control is provided either by a regulator
built into the heating mantle (Fig. 5.13a) or by an external controller, which
is connected to the mantle by a plug.
Some mantles, 'stirrer mantles', have a built-in magnetic stirrer just like a
stirrer hot plate and can be used to mix the liquid using a magnetic flea or
bar (Fig. 5.13b). Stirrer mantles have two controls on the side: make sure that
you know the function of each, since one controls the extent of heating and
the other the stirrer speed.
Some mantles, 'stirrer mantles', have a built-in magnetic stirrer just like a
stirrer hot plate and can be used to mix the liquid using a magnetic flea or
bar (Fig. 5.13b). Stirrer mantles have two controls on the side: make sure that
you know the function of each, since one controls the extent of heating and
the other the stirrer speed. |
|
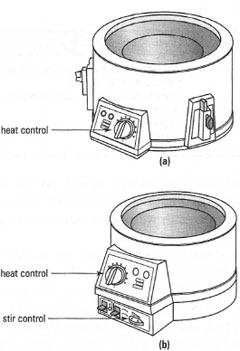 |
| Fig. 5.13 Mantles: (a) heating mantle; (b) stirrer mantle. |
|
When using mantles make the following safety checks:
- Make sure that the heating element is not damaged or worn. If in doubt
consult your instructor and get a replacement.
- Plug in and test the mantle controls ensuring that both heater and stirrer
are working. If fumes are given off from the heating elements someone
has spilt chemicals into the mantle: switch off, report the fault to your
instructor and obtain a replacement.
- Mantles are relatively slow to react to changes in the heater control
setting and it is easy to 'overshoot' the desired temperature. Therefore
always make small incremental changes in the heating control and if a
temperature below the boiling point of the liquid is required, make sure
that a thermometer is incorporated in the apparatus.
- When using a mantle with complex apparatus such as for distillation, support the mantle on a 'labjack' so that it can be removed
quickly if overheating occurs (Fig. 5.14).
- If the mantle is not equipped with a stirrer, remember to add antibumping
granules to the liquid.
|
|
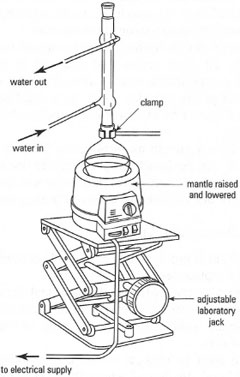 |
| Fig. 5.14 Heating using a stirrer mantle. |
|
Hot-air guns
These can be used instead of Bunsen burners or micro burners provided that
the temperature required is not too high. The main uses of hot-air guns are
for drying glassware and as a heat source for distillation of liquids at
relatively moderate temperatures up to about 120°C.
Hot-air guns produce heated air, usually at two temperatures, and
cold air. As with a burner, the heat transferred to the flask being heated
can be controlled by 'waving' the hot air stream around the flask).
Remember that the hot-air gun has a hot-wire heating element; therefore
do not use it in the presence of flammable vapours. The nozzle of the hotair
gun will become very hot and can cause burns or even ignite some
solvents for some time after it has been switched off. You should switch the
gun to the cold-air mode for a few minutes after you have finished heating
and place it in a 'holster' made from a support ring before finally turning
off the gun.
Handling hot glassware
The safety precautions necessary for handling hot glassware depend upon:
The temperature of the glassware.
The type of glassware: test tube, beaker, conical flask, round-bottom
flask, etc.
The size of the glassware.
The manipulation being carried out.
Normally you do not need any hand protection to handle glassware at
temperatures up to 50 QC. For general-purpose work, such as removing
glassware from the drying oven, assembling hot glassware and manoeuvring
hot beakers and conical flasks to and from a burner, steam bath or hot plate,
heat-resistant gloves are suitable and should be available in the laboratory.
Where more intricate processes are required, such as hot filtration, then
'rubber fingers' made from medium-wall rubber tubing (Fig. 5.15) give
adequate protection up to about 120QC and are less cumbersome than
insulated gloves. 'Rubber fingers' are useful for small volumes, up to 150 mL,
of liquids when the flask or beaker can be easily held by one hand. If larger
volumes are being manipulated then two hands are required and heatresistant
gloves are essential. |
|
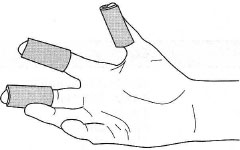 |
| Fig.5.15 Rubber 'fingers'. |
|
The following specific techniques should be noted:
- Test tubes: should be held by a wooden test tube holder (Fig. 5.16), which
provides adequate insulation and grip. You should never use folded pieces
of paper or metal tongs.
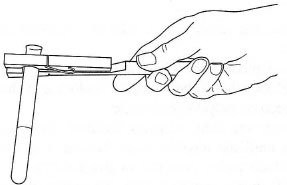
- Conical flasks: are often clamped to a support stand during heating and
you should never attempt to use the clamp as a device to hold the flask
when removed from the support stand. If you place the flask on the
laboratory bench with the clamp attached it will fall over because of the
weight of the clamp. Furthermore, you will have little control over the pouring process. Use 'rubber fingers' or an insulated glove and never use
folded pieces of paper or metal tongs (Fig. 5.17).
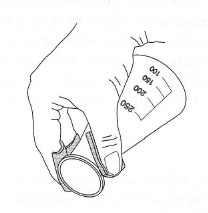
- Beakers: these have specific problems since they have no narrow neck
which can be gripped for lifting. Small beakers of volumes up to 400 mL
capacity can easily be gripped in one hand protected by an insulated
glove or 'rubber fingers'.
- Round-bottom flasks: small flasks of capacity up to 250 mL should be held
at the neck, gripped in one hand protected by an insulated glove or
'rubber fingers' and when moving and pouring from larger flasks they
should be held by the neck and supported underneath. Do not use a
clamp round the neck of the flask as a support.
 |
| Fig. 5.16 Holding a test tube. |
|
|
 |
| Fig.5.17 Pouring a hot solution. |
|


