Measuring and dispensing liquids
Measuring and dispensing liquidsThe equipment you should choose to measure out liquids depends upon the volume to be dispensed, the accuracy required and the number of times the job must be repeated (Table 3.1).
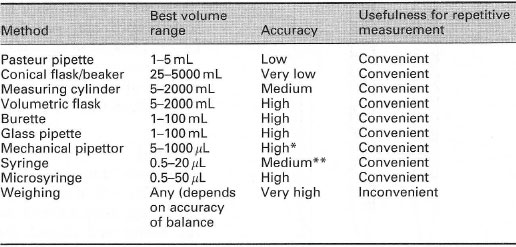 |
| Table 3. 1 Criteria for choosing a method for measuring out a liquid |
Conical flasks, beakers, measuring cylinders and volumetric flasks measure the volume of liquid contained in them, while burettes, pipettes, pipettors, syringes and micro syringes mostly measure the volume delivered from them: think about the requirements of the experiment.
Certain liquids may cause problems:
- High-viscosity liquids are difficult to dispense: allow time for the liquid to transfer.
- Organic solvents may evaporate rapidly, making measurements inaccurate: work quickly; seal containers quickly.
- Solutions prone to frothing (e.g. surfactant solutions) are difficult to
measure and dispense: avoid forming bubbles; do not transfer quickly.
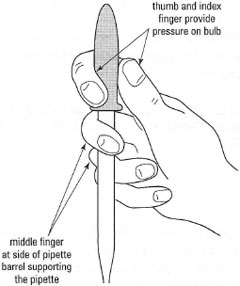
| Pasteur pipettes Hold correctly during use (Fig. 3.1) - keep the pipette vertical, with the middle finger gripping the barrel to support the pipette while the thumb and index finger provide controlled pressure on the bulb, and squeeze gently to provide individual drops. To prevent liquid being sucked into the bulb and hence cross-contamination:
|
|
Conversely, if volatile liquids such as dichloromethane (DCM), ethanol, propanone (acetone) or diethylether (ether), for example, are to be dispensed, the warmth of the glass pipette will cause the liquid to squirt from the pipette without any pressure on the bulb. To prevent this, suck up the liquid several times into the pipette so as to cool the glass and then dispense as normal.
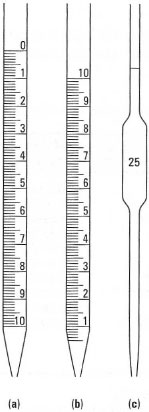
| Conical flasks and beakers These have approximate graduations and should only be used for measuring volumes of solutions/liquids where accuracy is unimportant. Measuring cylinders and volumetric flasks These must be used on a level surface (the laboratory bench) so that the scale is horizontal; you should first fill with solution until just below the desired mark, then fill slowly (e.g. using a Pasteur pipette) until the bottom of the meniscus is level with the mark. Remember to allow time for the solution to run down the walls of the vessel and to bend down so that your eyes are level with the graduation mark(s) and the meniscus. Burettes These must be mounted vertically in a clamp - don't over-tighten the clamp - or in a burette holder, on a stand. First ensure that the tap is closed and, using a funnel, add a little of the solution to be dispensed, rinse the burette and discard the washings through the tap: this is vital in titrations where a little water in the burette will alter the concentration of the solution. Refill the burette with solution, open the tap and allow the liquid to fill the barrel below the tap, then take a meniscus reading, noting the value in your notebook. Dispense the solution via the tap and measure the new meniscus reading. The volume dispensed is the difference between the two readings. Pipettes There are various designs, including graduated and bulb (volumetric) pipettes (Fig. 3.2). Take care to look at the volume scale before use: some graduated pipettes empty from full volume to zero, others from zero to full volume; some scales refer to the shoulder of the tip, others to the tip by gravity. Never blowout volumetric (bulb) pipettes, just touch the tip against the inside wall of the vessel. Rinse out pipettes with a little of the solution to be delivered before commencing the accurate measurement. To prevent cross-contamination, never draw the solution into the pipette filler. |
|
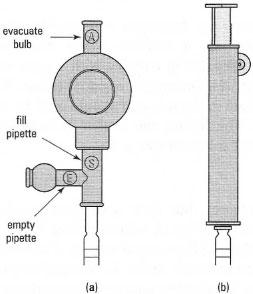
*Note: For safety reasons, it is no longer permissible to mouth pipette - various aids (pipette fillers) are available, such as the rubber-bulb and Pi-Pump® (Fig. 3.3).
Pipettors (autopipettors)
There are two basic types:
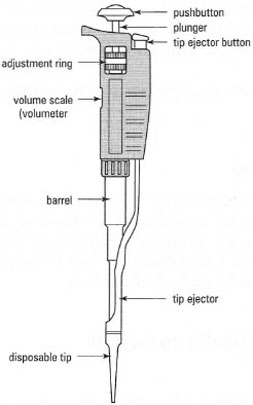
- Air displacement pipettors. For routine work with dilute aqueous solutions. One of the most widely used is the Gilson Pipetrnan® (Fig. 3.4).
- Positive displacement pipettors. For non-standard applications, including dispensing viscous, dense or volatile liquids where an air displacement pipettor might create aerosols leading to errors.
- Fixed volume: capable of delivering a single factory-set volume.
- Adjustable: where the volume delivered is determined by the operator across a particular range of values.
- Pre-set: movable between a limited number of values.
- Multichannel: able to deliver several replicate volumes at the same time.
Whichever type of these routine but expensive devices you use, you must ensure that you understand the operating principles of the volume scale and the method for changing the volume delivered - some pipettors are easily misread.
A pipettor must be fitted with the correct disposable tip before use and each manufacturer produces different tips to fit particular models. Specialized tips are available for particular applications.
If you accidentally draw liquid into the barrel, seek assistance from your demonstrator/supervisor since the barrel will need to be cleaned before further use (to prevent cross-contamination) and unskilled dismantling of the device will cause irreparable damage.
|
|
Syringes
Syringes should be used by placing the tip of the needle into the solution and slowly drawing the plunger up to the required point on the scale. Check the barrel to make sure no air bubbles have been drawn up, and expel the solution slowly, touching the needle tip on the side of the vessel to remove any adhering solution. If there is air in the barrel, fill past the mark, invert the syringe and push the plunger to the mark so that the air and a little of the solution are expelled into a waste collection vessel. Then dispense the solution.
Microsyringes should always be cleaned before and after use by repeatedly drawing up and expelling pure solvent. The dead space in the needle can occupy up to 4% of the nominal syringe volume. Some microsyringes have a fine wire attached to the plunger, which fills the dead space. Never pull the plunger out of the barrel.
Balances
These can be used to weigh accurately how much liquid you have dispensed. Convert mass to volume using the equation:
Mass/density = volume
e.g. a liquid (9.0g) of density (l.2gmL-1) = 7.5mL. Densities of common solvents and common chemicals can be found in Lide (2000). You will also need to know the liquid's temperature, since density is temperature dependent.
Support our developers


