Jointed glassware
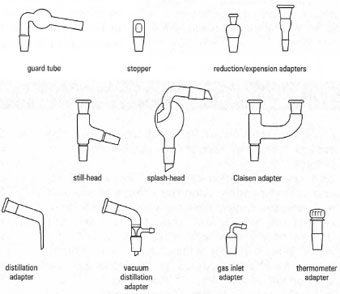
This type of glassware, commonly known as Quickfit'[', comprises a complete range of components fitted with standard-taper ground-glass joints. The joints are fully interchangeable with those of the same size and apparatus for a whole range of experiments can be assembled from the simple components without the need to use rubber bungs, corks, etc. Where there is a mismatch between the sizes of the joints of the pieces of glassware, reduction and expansion adapters can be used. A typical range of jointed glassware is illustrated in Fig. 5.20.
|
|||
| Fig. 5.20 Glass equipment with standard-taper ground-glass joints. |
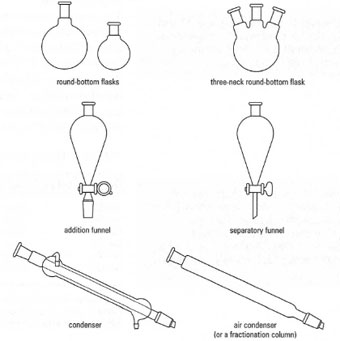
The ground-glass joint on the glassware is classified according to the diameter of the joint at its widest point (internal diameter) and the length of the ground-glass portion of the joint. Thus a 14/23 joint has a maximum internal diameter of 14mm and a length of 23 mm. Other common joint sizes you will frequently encounter are 19/26, 24/29 and 35/39. The joint size is always etched into glass on the side of or near to the joint. For obvious reasons, joints are categorized as 'female' and 'male'.
Care of jointed glassware
Jointed glassware is much more expensive than ordinary glassware because of the precision required in fabricating the joints. If the joints 'seize' and cannot be separated the glassware cannot be used again and you may have the problem of a stoppered flask containing a volatile organic solvent, which somebody has to open! If this happens, consult your instructor for help and further advice.
There are two main causes of 'seized' joints:
- Using solutions of potassium hydroxide or sodium hydroxide in water or other solvents, which attack the glass.
- Trapping chemicals, including solids and solutions of solids, in the ground-glass joints.
To grease a joint, put a small smear of grease on the upper part of the 'male' joint, push it into the 'female' joint with a twisting movement and the joint should become 'clear' from the top to about half-way down. If more than half the joint has become 'clear', you have used too much grease: separate the joints, clean with a solvent-soaked cloth and repeat the process.
To avoid trapping chemicals in the ground-glass joints, fill flasks etc. using a long-stemmed filter funnel or paper cone, which extends past the joint into the flask.
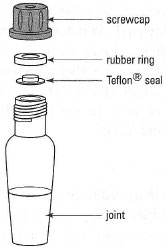
Screwcap adapters Screwcap or thermometer adapters allow you to place thermometers, glass tubes or air bleeds into jointed glassware flasks. The screwcap adapter works by using the screwcap to compress a rubber ring round the thermometer or glass tube and thus hold it in place. The flexibility of the system allows the height of the thermometer/glass tube to be varied. The adapters come in different joint sizes and varying hole sizes to accommodate different-diameter thermometers, tubes, Pasteur pipettes, etc. The component parts of a screwcap adapter are shown in Fig. 5.21. |
|
To use the screwcap adapter with a thermometer:
- Always disassemble the adapter to ensure that the rubber ring and the Teflon® seal are present. If they are missing, get replacements before use. The Teflon® seal is to protect the rubber ring from corrosive and solvent vapours.
- Ease the rubber ring onto the thermometer and slide the Teflon® seal on below the ring.
- Slide the screwcap over the top of the thermometer and then screw the whole assembly onto the base of the adapter and tighten the screw slightly, just enough to hold the thermometer.
- Trial fit the adapter and thermometer into the apparatus and adjust the height of the thermometer by disassembling the adapter and moving the rubber ring up or down. Reassemble the adapter.
- Check for final fit and tighten the screwcap firmly, but do not over-tighten.
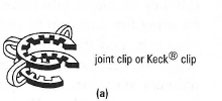
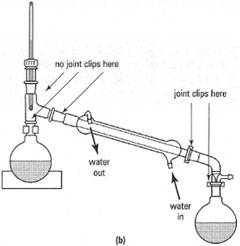
| Joint clips Plastic joint clips or Keck® clips (Fig. 5.22a) are used for holding groundglass joints firmly together and may be used to replace clamps and support stands at certain points when building apparatus and are essential when using rotary evaporators. The main weakness of these otherwise useful devices is that they soften at about 130°C and this may allow the joints to separate. Therefore they should never be used at the 'hot end' of a distillation, for example. The clip should be used to hold a distillation adapter on the end of a water condenser, or the flasks onto a fraction collector, but never on the distilling flask or to hold the condenser onto the still head (Fig. 5.22b). When using joint clips always:
|
|
Support our developers


